

Setting up the Salesforce Integration

When you connect Salesforce and MeetMax, you can make event registration easier, and keep Campaign data updated automatically.
In this article:
- Where is it?
- Enabling the integration in Salesforce
- Enabling the integration in MeetMax
- MeetMax Setup: OAuth (Legacy)
- MeetMax Setup: JWT Bearer Token
Where is it?
Once it’s enabled, you’ll manage the integration from the Configure tab:

| This integration requires an Enterprise level Salesforce account. You’ll also need Administrator permissions. | |
| We’re using Salesforce Lightning edition here. If you use Classic, please reach out to our Support team. |
Enabling the integration in Salesforce
First, you’ll set up a Connected App in your Salesforce account.
- Step 1. Go to Setup mode:

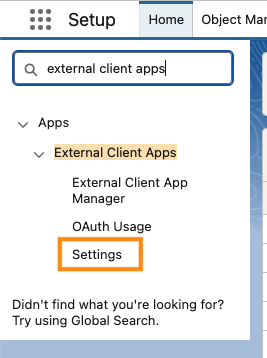
- Step 2. On the Setup page, use the Quick Search to find External Client Apps. Click the Settings link:
- Step 3. In the Basic Information section, enter these details:
- • The External Client App Name (MeetMax)
- • API Name (MeetMax)
- • Your Contact Email
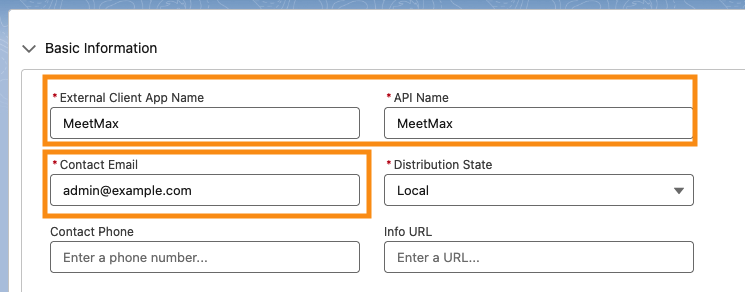
- You can leave the rest of the fields blank.
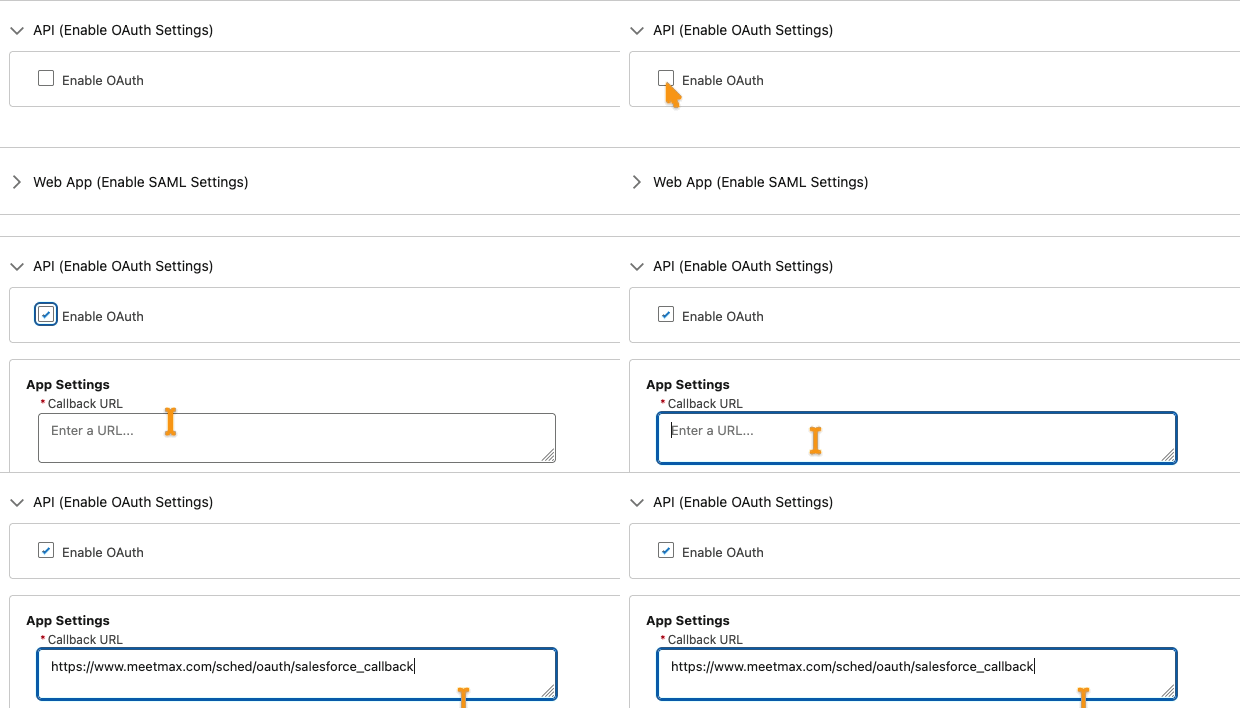
- Step 4. In the API (Enable OAuth Settings) section, click the Enable OAuth Settings checkbox.
- A Callback URL box will appear. Paste in the following URL:
-
https://www.meetmax.com/sched/oauth/salesforce_callback
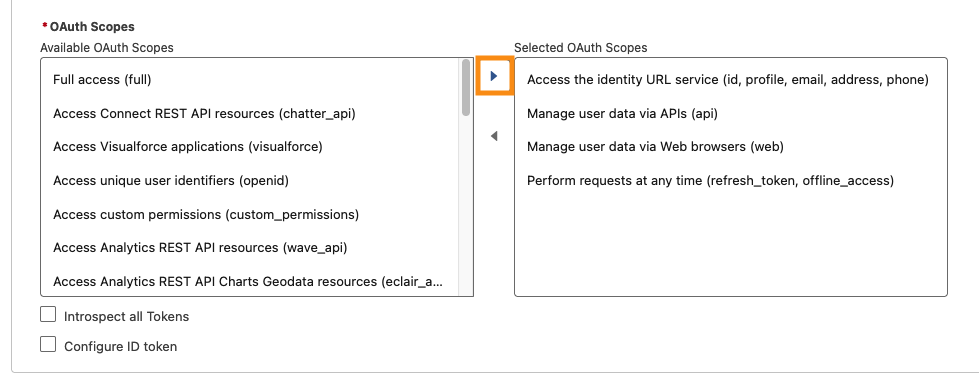
- Step 5. In the Available OAuth Scopes box, select the four scopes below, one by one.
- Click the button to move each one into the Selected OAuth Scopes box:
- • Access the Identity URL service (id, profile, email, address, phone)
- • Manage user data via APIs (api)
- • Manage user data via web browsers (web)
- • Perform requests at any time (refresh_token, offline_access)
- You can leave all other fields in their default state.
- Step 6. Scroll to the bottom of the page and click Create:

- Step 7. Click Continue to return to the External Client App’s page.
- Head to the API (Enable OAuth Settings) section.
- Click the Manage Consumer Details button:

- Depending on your Salesforce account setup, you might need to complete an authorization step at this point.
- Step 8. Salesforce will reveal two pieces of information. Depending on the MeetMax setup you're using, you’ll need to paste one or both of these into MeetMax:
- • OAuth Consumer Key
- • OAuth Consumer Secret
- Leave this tab open while you go to your MeetMax account.
Enabling the integration in MeetMax
- Step 1. In MeetMax, head to the Configure tab. Choose Event Settings, then Enable Features:

- Step 2. Scroll down to the Integrations section of the page. Under Do you wish to integrate with Salesforce, click Yes:

- Step 3. Scroll to the bottom of the page and click Save:

MeetMax Setup: OAuth (Legacy)
| Use these steps if your Salesforce account was created before June 2026. |
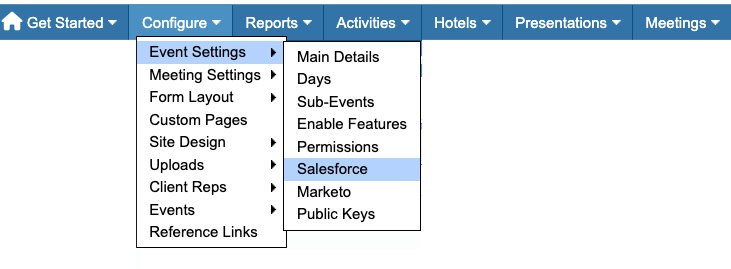
- Step 1. Head to the Configure tab. Choose Event settings, then Salesforce:
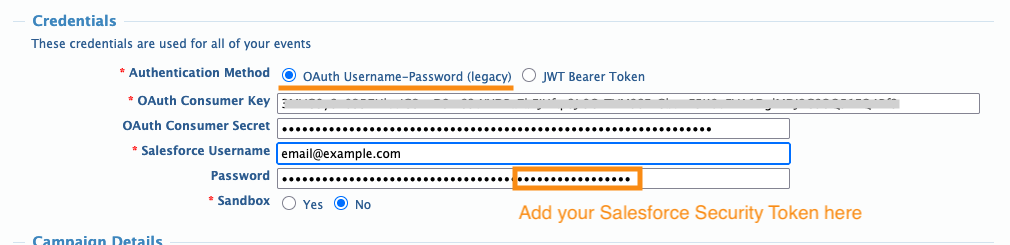
- Step 2. On the Salesforce settings page, fill out these fields:
- • Authentication Method: Choose OAuth Username-Password (Legacy).
- • OAuth Consumer Key and OAuth Consumer Secret: In the section above, you located these in Salesforce. Paste them in here.
- • Username: Add your Salesforce account email address.
- • Password: Add your Salesforce password.
- • Add your Salesforce security token to the end of your password (See the section below for details.)
- • Sandbox: Indicate whether you’re connecting to a Salesforce Sandbox instance or not.
- Step 3. Ignore the Campaign Details section for now, and click Save:

- Learn more about how MeetMax integrates with your Salesforce Campaign here.
Your Salesforce security token
To connect the integration, you’ll need to add your Salesforce security token to the end of your Salesforce password, as shown above.
If you already know your security token, you can paste that at the end of your password.
If you don’t have your current security token, you can reset it and get a new one to paste in. Follow Salesforce’s steps to reset your token.
| Resetting your security token could impact other application connections in your Salesforce account. Check with your Salesforce administrator first. |
MeetMax Setup: JWT Bearer Token
| Use these steps if your Salesforce account was created after June 2026. |
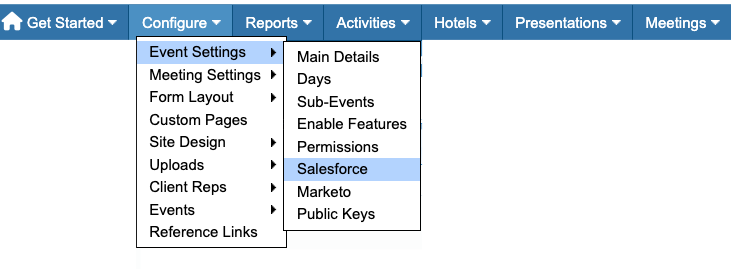
- Step 1. Head to the Configure tab. Choose Event Settings, then Salesforce:
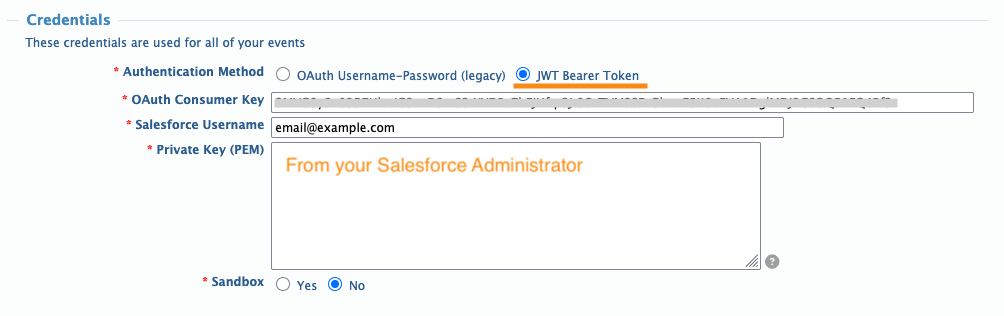
- Step 2. On the Salesforce settings page, fill out these fields:
- • Authentication Method: Choose JWT Bearer Token.
- • OAuth Consumer Key: In the section above, we located this in Salesforce. Paste it in here.
- • Salesforce Username: Add your Salesforce account email address.
- • Private Key (PEM): Your Salesforce administrator will have this key. See the note below.
- • Sandbox: Indicate whether you’re connecting to a Salesforce Sandbox instance or not.
- Step 3. Ignore the Campaign Details section for now, and click Save:
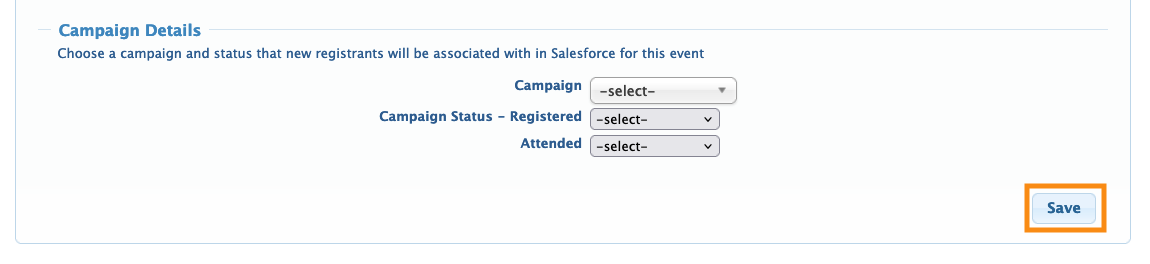
- Learn more about how MeetMax integrates with your Salesforce Campaign here.
-
For more information on generating and managing your JWT Bearer Token and Private Key, please see Salesforce’s documentation. The way your team manages your private key will depend on your organization’s security policy. Always paste this key directly into the MeetMax page above. Never email it to our Support team.
What’s Next?
Now that the integration is connected, you can:

