
In this article:
- What does it look like?
- Choose which event details to display
- Adding the calendar links to a Header or Footer
- Adding the calendar links to a custom Message
- Notes for Developers
What does it look like?
You can choose between two formats:
Row of links
With this option, your participants see a row of clickable links for major calendar platforms. When someone clicks one of these links, it creates a new calendar entry for your event.

You can use this option in:
- The Header or Footer of all event web pages
- The custom Messages areas of specific pages
- Batch emails
| To use this option, you’ll paste this custom code snippet: $SAVE_THE_DATE |
Menu of links
With this option, your participants can open a menu of calendar platforms. Clicking any of these creates a new calendar entry for your event.

You can use this option in:
- The Header or Footer of all event web pages
- The custom Messages areas of specific pages
| To use this option, you’ll paste this custom code snippet: $SAVE_THE_DATE_BTN |
See the sections below for details on how to add a code snippet to your event.
Choose which event details to display
By default, the “Save the Date” links create a calendar event that includes:
- Event title
- Start and end date (Calendars will show an “All day” listing)
- Location
As an option, you can also add:
- Start and end times
- Event description
Enabling the default display
There’s nothing you need to do here. Paste in the code snippets as shown in the sections below, and the display uses the default event details.
Adding start and end times
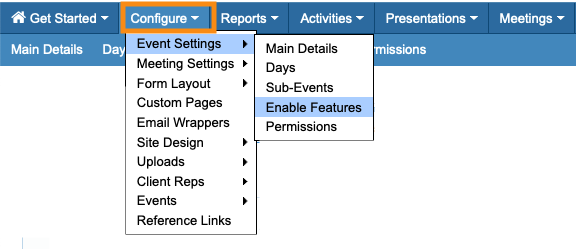
- Step 1. Head to the Configure tab. Choose Event Settings, then Enable Features:
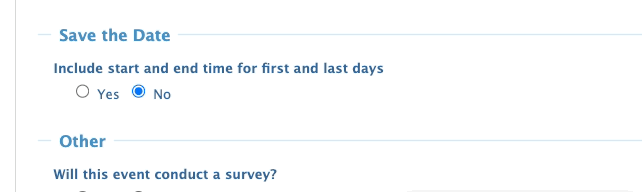
- Step 2. Scroll to the Save the Date section.
- Under Include start and end time, choose Yes. Then set your first-day start and last-day end times:
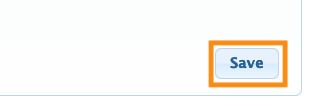
- Step 3. Scroll to the bottom of the page and click Save:
Adding an event description
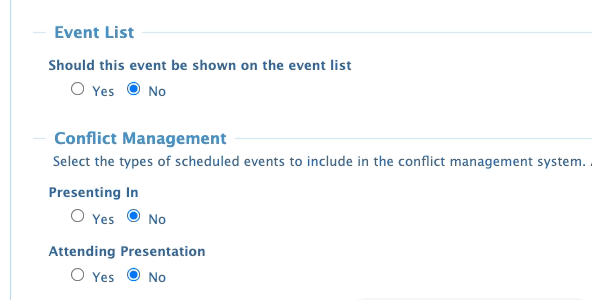
- Step 1. While you’re on the Enable Features page as shown above, scroll to the Event List section.
- Step 2. Under Should this event be shown on the event list, click Yes.
- Then enter your event’s main website URL (if it has one), and the description text:
- Step 3. Scroll to the bottom of the page and click Save:

-
Adding this event to the Event List also allows you to use these details elsewhere. Learn more about the public Event List here.
Adding the calendar links to a Header or Footer
With this option, the Save the Date links will appear on every web page your participants see. You can remove the links at any time.
- Step 1. Head to the Configure menu. Choose Site Design, then Header:

- Step 2. Next, you’ll choose which area to place the links:
- • TOP: Places links in the site Header
- • FOOTER: Places links in the site Footer

- Step 3. When you make your choice, you’ll be in the content editor.
- Copy your preferred code snippet below, and paste it where you want the links to appear. Click the Change button to save:

- For the Row of Links version:
-
$SAVE_THE_DATE
- For the Menu of Links version:
-
$SAVE_THE_DATE_BTN
- Step 4. Want to preview the result? Use your Reference links:
-
If you’re having any issues with formatting, reach out to our Support team.
Adding the calendar links to a custom Message
In MeetMax, Messages are units of custom content you can insert into the web pages or emails your participants see.
- Step 1. Head to the Configure tab. Choose Site Design, then Messages:

- Step 2. On the Messages list, set the top filter to With Custom Messages.
- That narrows the list, so you’ll only see the messages that apply to your event:

- Step 3. You might need a second filter to find the specific Message you need. Learn more about filtering the Message list here:

- Step 4. Once you’ve found the Message, click the tag icon to edit it:

- Step 5. You’ll now choose the location where you want to insert the Save the Date links:
- • TOP: The links appear above the web page content.
- • BOTTOM: The links appear below the web page content.

- Step 6. When you make your choice, you’ll be in the content editor.
- Copy your preferred code snippet below, and paste it where you want the links to appear. Click Submit to save:

- For the Row of Links version:
-
$SAVE_THE_DATE
- For the Menu of Links version (not available for emails):
-
$SAVE_THE_DATE_BTN
- Step 7. Want to preview the result? Click the View Sample link:

- MeetMax will open a sample of the page in a new browser tab:

-
If you’re having any issues with formatting, reach out to our Support team.
Notes for Developers
You can access an .ics file of the event details with the following link structure:
https://[subdomain].meetmax.com/sched/event_[event_id]/event.ics
You can access a .json file of the event details with the following link structure:
https://[subdomain].meetmax.com/sched/event_[event_id]/save_the_date.json

