
In this article:
- Where is it?
- Adding a Client Rep
- Setting the account password
- Editing a Client Rep account
- Removing a Client Rep
Where is it?
In MeetMax, an Admin is called a Client Rep.
To add and manage your Client Rep accounts, head to the Configure tab:

Adding a Client Rep
- Step 1. Head to the Configure tab. Choose Client Reps, then Client Rep List:
- Step 2. On the Client Rep List page, click the Add Client Rep button:

- Step 3. Enter the key details for this Client Rep. (See details below.)
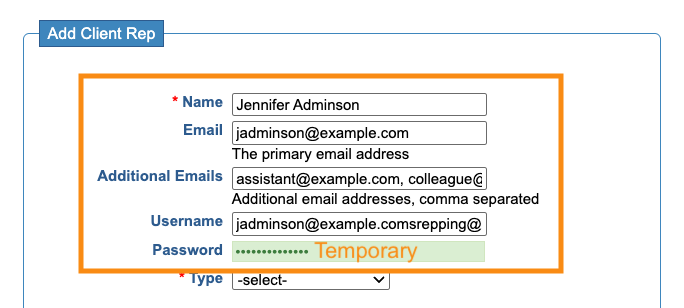
- • Name: The Rep’s name
- • Email: The Rep’s primary email address. It’s used as the From address on correspondence sent from MeetMax. If your event integrates with Corpaxe, this is the email we export to their calendar.
- • Additional emails: Add as many secondary email addresses as you like here, separated by commas. Many Reps use their assistant’s or colleagues’ email addresses here. When any MeetMax communication is cc-ed to the Client Rep, MeetMax also sends it to all of the secondary email addresses.
- • Username: We recommend using the email address again here.
- • Password: For now, enter a temporary, placeholder password. (You’ll prompt this user to set their own password in a moment.)
- Step 4. Set the Type of access this Client Rep will have. MeetMax offers several levels of permissions:
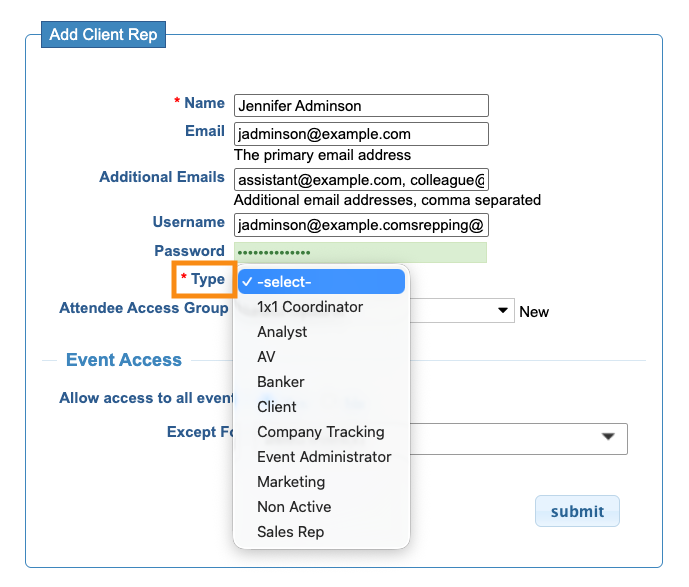
-
Our Support team can enable or disable any of the existing permissions for each role. - Step 5. The Attendee Access Group field is useful if you need to organize your Client Reps into groups, and assign specific Attendees to each group. Learn more about Client Rep Groups here:

- Step 6. Finally, choose which of your events this Client Rep will be able to access.
- Choose Yes to give them access to all events.
- If you need to exclude any events from access, use the drop down list to choose them:
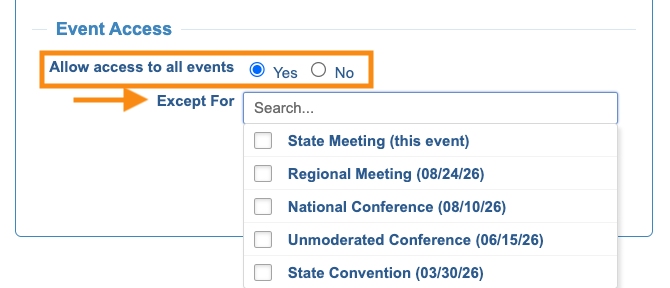
-
You can also flexibly assign different groups of Reps to different events. Learn how to do this here. - Step 5. Click Submit to save the new account.
Setting the account password
Because a Client Rep has access to sensitive details, you’ll want to let each one set their own confidential password.
In Step 3 above, you set up a placeholder password to create the account. Now that you’ve saved the new account, head back to the Client Rep List page.
Locate the account and click the Reset link:

That generates a password reset email to the account email address. The Client Rep can then set their own password.
This is also the process you'd use if one of your Client Reps needs their password reset.
| Your event might already have an email wrapper set up for communications with participants. If that wrapper contains a Login button, keep in mind that this button won’t work for Client Rep login. Instead, your team needs to click the link in the body of the email. |
Editing a Client Rep account
You can make changes to your Client Reps at any time.
Head back to the Client Rep List page. Locate the person you need to edit, and click the Edit link:

Be sure to click Submit to save your updates!
Removing a Client Rep
Client Rep accounts can't be deleted, but they can be disabled. You can remove all of the account’s permissions, so it can’t access anything.
Use the steps above to edit the Client Rep account. Then set the Type to Non Active:
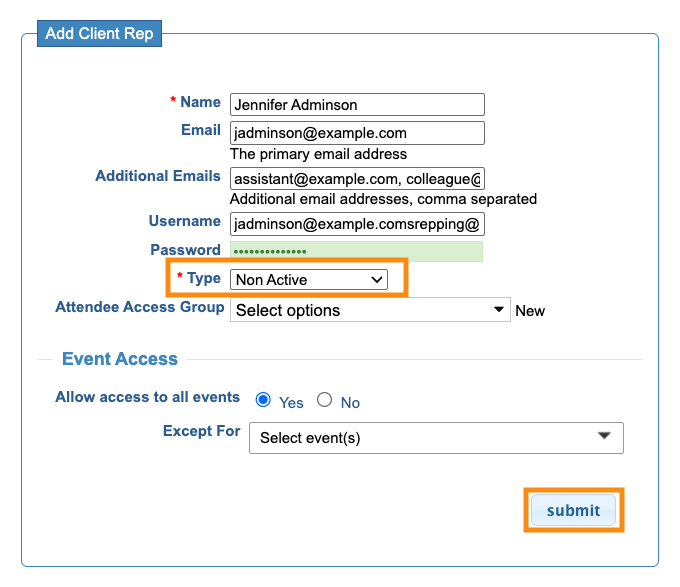
You'll still see the Client Rep on your Client Rep List, but the account is inactive.
| We also offer Single Sign-On for Enterprise clients. Learn more about SSO here. |

