
In this article:
- Where is it?
- What data can you include?
- Adding columns to the report
- Shaping data with filters
- Saving your custom report
- Exporting reports
- Commonly-used reports
Where is it?
The Attendee List is in the Attendees tab:

On the Attendee List, you’ll use these tabs to shape and save your reports:

Think of the Attendee List as a flexible database. You can change it throughout your event, showing exactly the information you need at any time.
| You can also create custom reports in the Company List. |
What data can you include?
The Attendee List can display a wide range of data, including:
- Details about each Attendee, Company Rep, and Guest
- Information about how they request and schedule meetings
- Details of their interest in Presentations, and who's presenting
- Details of their interest in Activities
- Information about webcast views
- Details about hotels and transportation (if you’re using these features)
- Any custom fields you’ve added to your registration forms
To see your options, head to the Columns tab. Use the Select menu to scroll through all the available data:

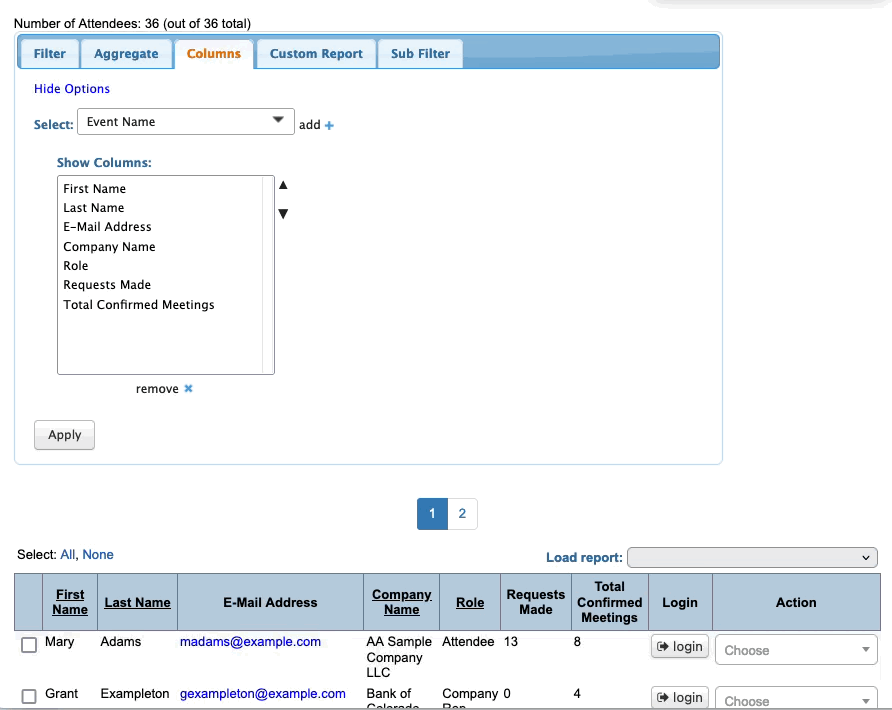
Adding columns to the report
When you know what data you want in your custom report, you'll add those columns to the Attendee List.
In the Columns tab, you can add, remove, and re-order the columns as shown below. Click Apply to save the changes:

| Remember, reports can only display the columns you've added. |
Shaping data with filters
If you want to include every Attendee on your report, you can skip to the Saving section below.
More commonly, however, you might want your report to include a subset of your Attendees. You'll use filters to narrow the list down.
In the Filters tab, you can choose from many kinds of filters. Again, they’re related to:
- Attendee, Company Rep, and Guest details
- Presentation, Activity, Hotel, and Transportation details
- 1x1 meeting requests and scheduling
- Custom fields you’ve created
Filters are very flexible. MeetMax has two menus of available filters you can use. Depending on your needs, you might use one or the other, or both together:
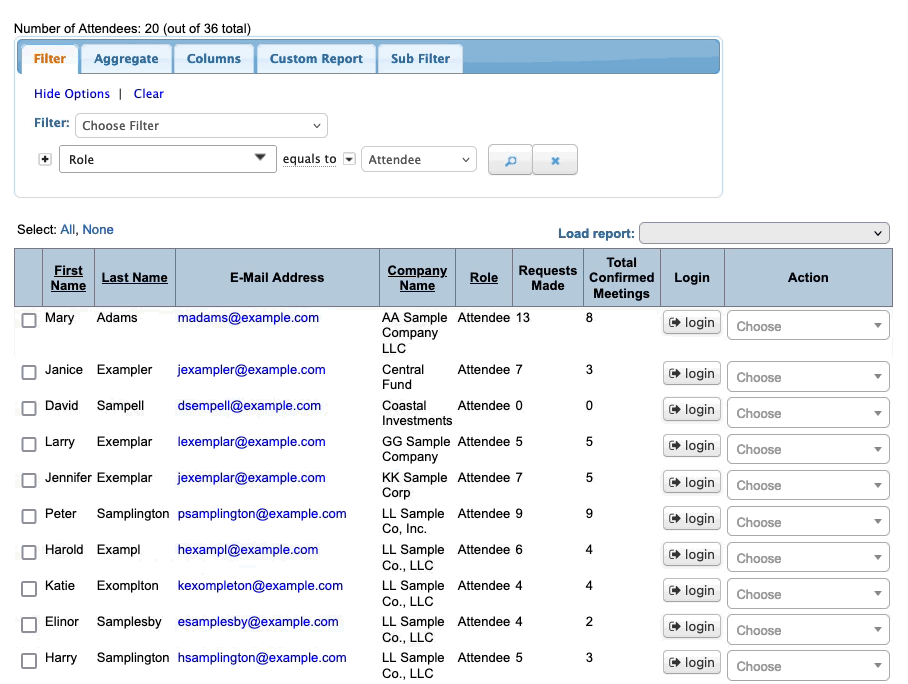
In the example below, we need to see all the Company Reps who haven’t been scheduled for any 1x1 meetings yet.
- We’ll first filter by Role, to see all the Company Reps.
- Then we’ll add the filter for Without Confirmed Meetings:

You can also add more filters, to get more precise information.
In the example below, our team has been busy checking Attendees in at the event. Now we need a list of everyone who's checked in.
- We’ve already filtered the list by Role, to see all the Attendees.
- We’ll add a second filter to see which of them have completed check-in:
Removing filters

- Click the X button to remove one filter.
- Click Clear to remove all current filters.
Saving your custom report
As you filter your Attendee List to different views, you might want to save some of them to access later.
To save any view as a report, head to the Custom Report tab. Use the menu to choose New.
Give your report a name, choose whether to share it with your team, and click Save:

Now, you can access this report any time. Head to the top right corner of the Attendee List. Use the Load report menu to choose your custom report:

You’ll also find a selection of handy default reports in this menu.
When you’re ready to return to the full Attendee List, choose Standard Layout.
Exporting reports
While you’re using the Attendee List, you can export your current view as a spreadsheet any time. The export will contain only the data in your current columns and filters.
Head to the top right corner of the page. Choose Bulk Actions, then Excel:

You can open the downloaded file in any spreadsheet software.
Commonly-used reports
In the Reporting section of this knowledge base, you'll find:

