In this article:
Where is it?
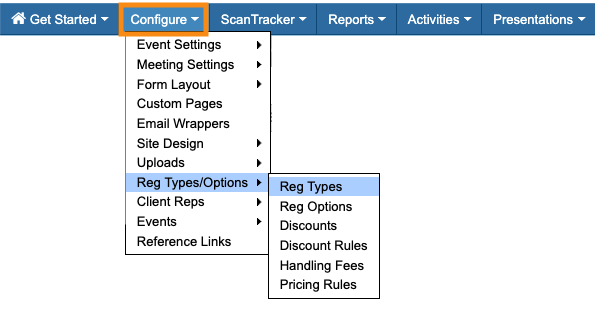
Once payments are enabled for your event, you’ll add and manage Registration Types from the Configure tab:
How is it used?
Different kinds of events have different pricing structures for registration. Pricing can be based on many factors. Here are a few examples:
- Every Attendee might pay the same price to register.
- Maybe your Attendees register for free and all participating Companies pay to attend.
- Larger companies might pay a higher price than smaller companies, because the larger ones will have some of their team included for free.
- Exhibitors might pay a special price, but have access to a menu of optional paid add-on services.
- Sponsors might choose between several sponsorship levels, like Gold, Silver, and Bronze packages.
- Speakers might pay nothing to attend.
This is why MeetMax has such flexible pricing tools! You’ll need many ways to structure and offer prices.
Registration Types vs. Registration Options
Registration Types are interdependent with Registration Options:
- Registration Types are the admission tickets your participants choose when they register. Common examples are Early Bird or General Admission.
- Registration Options are the actual prices tied to each of those ticket types. They also function as add-on items you can flexibly offer to participants.
You can set up Registration Types for Attendees, Companies, Exhibitors, Sponsors - whoever needs to pay to attend your event.
Each Registration Type you create can have a single price attached, or multiple prices.
Adding a Registration Type
Our Support team will help you create your event’s initial Registration Types. If you need to add one, follow these steps.
- Step 1. Head to the Configure tab. Choose Reg Types/Options, then choose Reg Types:

- Step 2. Click the Add Registration Type button:

- Step 3. In this example, we’re offering different admission prices based on how early a participant registers. Above, you can see that we have an Early Bird ticket and a General Registration ticket.
- Let’s add a new Walk-In option, because we need to charge a slightly higher price for late registrants.
- The Add Registration Type form starts with these fields:
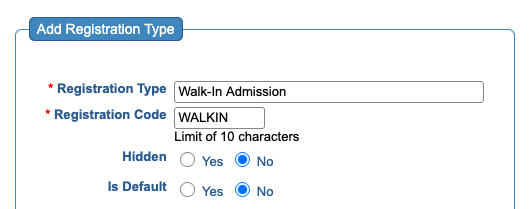
- • Registration Type: The public name of this admission ticket.
- • Registration Code: Add a code of up to 10 characters. Depending on your payment set-up, participants might type this code into MeetMax to get their price. (See an example of this at the bottom of this article.)
- • Hidden: Choose Yes here if you don’t want all registrants to see this price. We want this one to be visible. Above, you can see that the Free registration is hidden - we only want to offer that to specific people.
- • Is Default: If you want a Registration Type to be pre-selected on the registration form, choose Yes here.
- The rest of this form has optional fields that help you customize how you offer pricing. The way you use these depends on your event:
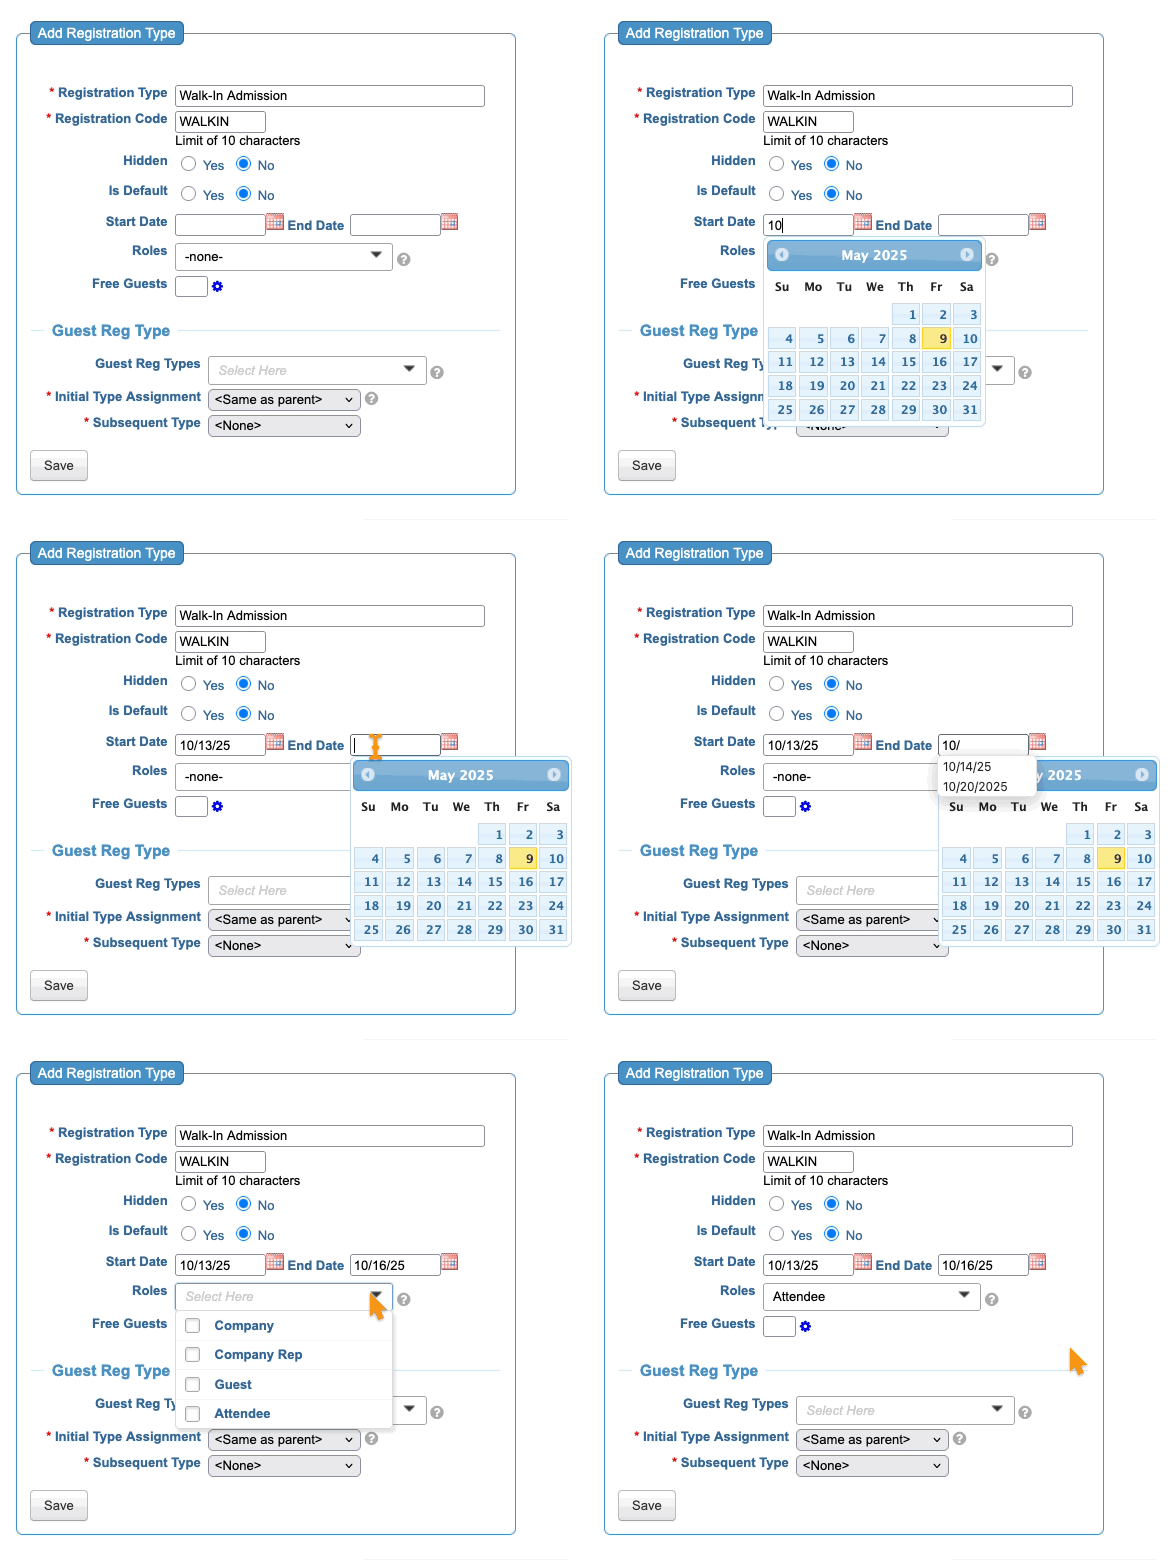
- • Start Date/End Date: You can make any price available only for specific dates. For this example, we’re creating a Walk-In admission, so we’ll enter the dates our event is live. We don’t want this price to be visible at any other time.
- • Roles: Choose which user types this price applies to. This example is for Attendee registration only.
- Step 4. That’s all the settings we need for this example. Click Save:

- Now, we have all the admission tickets we need for this example event:

- We’ll create a Registration Option to assign specific prices to each of these tickets.
Free Guest Options
You might have noticed the fields for Free Guests in the Registration Type form. The idea of Free Guests usually applies to organizations that attend your event, such as:
- Companies
- Sponsors
- Exhibitors
You might have an admission ticket for certain organizations, where the price includes a number of their team members at no extra charge. Those people are called Free Guests in MeetMax.
In this example, each Company attending our event pays a registration price that includes up to 5 of their team members. But if they bring more than 5 people, those extras will be charged the general admission price. So let’s set up that admission ticket.
- Step 1. Click Add Registration Type:

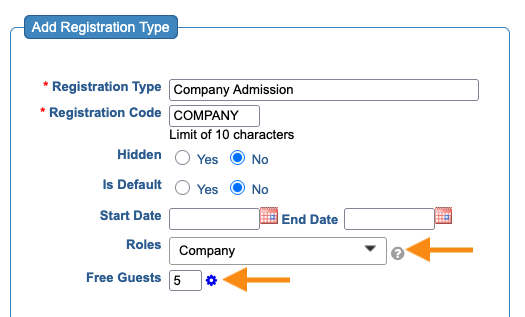
- Step 2. Fill in the fields you need. In our example, we’ll assign this new Registration Type only to Companies. And in the Free Guests field, we’ll enter the included 5 guests:
- Step 3. Next, we need to set up the price a company will pay for each team member beyond the included 5.
Click the gear icon to reveal the settings fields: 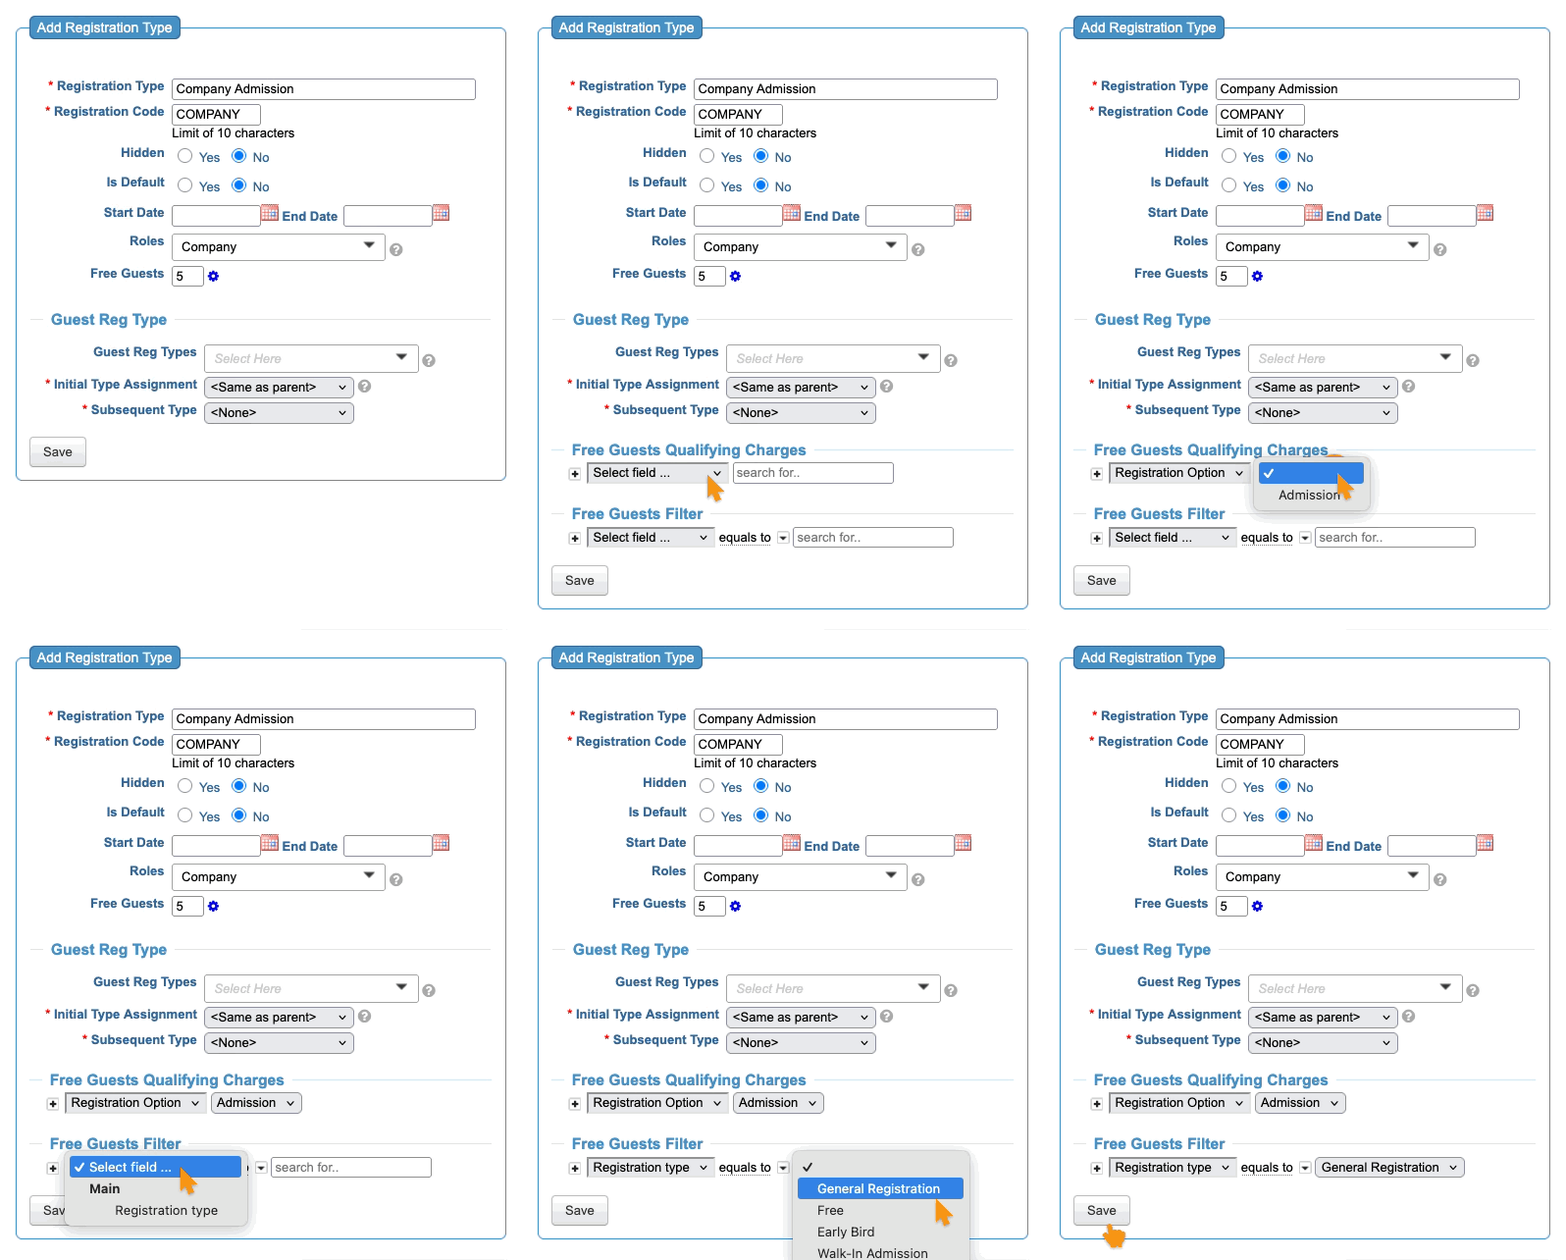
- • Free Guests Qualifying Charges: In this section, you’ll choose one of your Registration Options. We’re setting an admission price here, so we’ll choose Admission. (If your event has other Registration Options set up, you’d see them in this menu as well.
- • Free Guests Filter: Choose Registration Type. Then you’ll see a menu of your event’s admission tickets. Choose the one you want extra guests registered under. Our Support team can help you with these settings.
- Be sure to click Save!
- Now, each team member over the included 5 will be charged our General Admission rate when they register.
-
You can ignore the Guest Reg Type fields in this form - they don’t apply to most events. Our Support team will help you with these fields if your event requires them.
Sharing your pricing
Registration Types let you control how your participants access pricing.
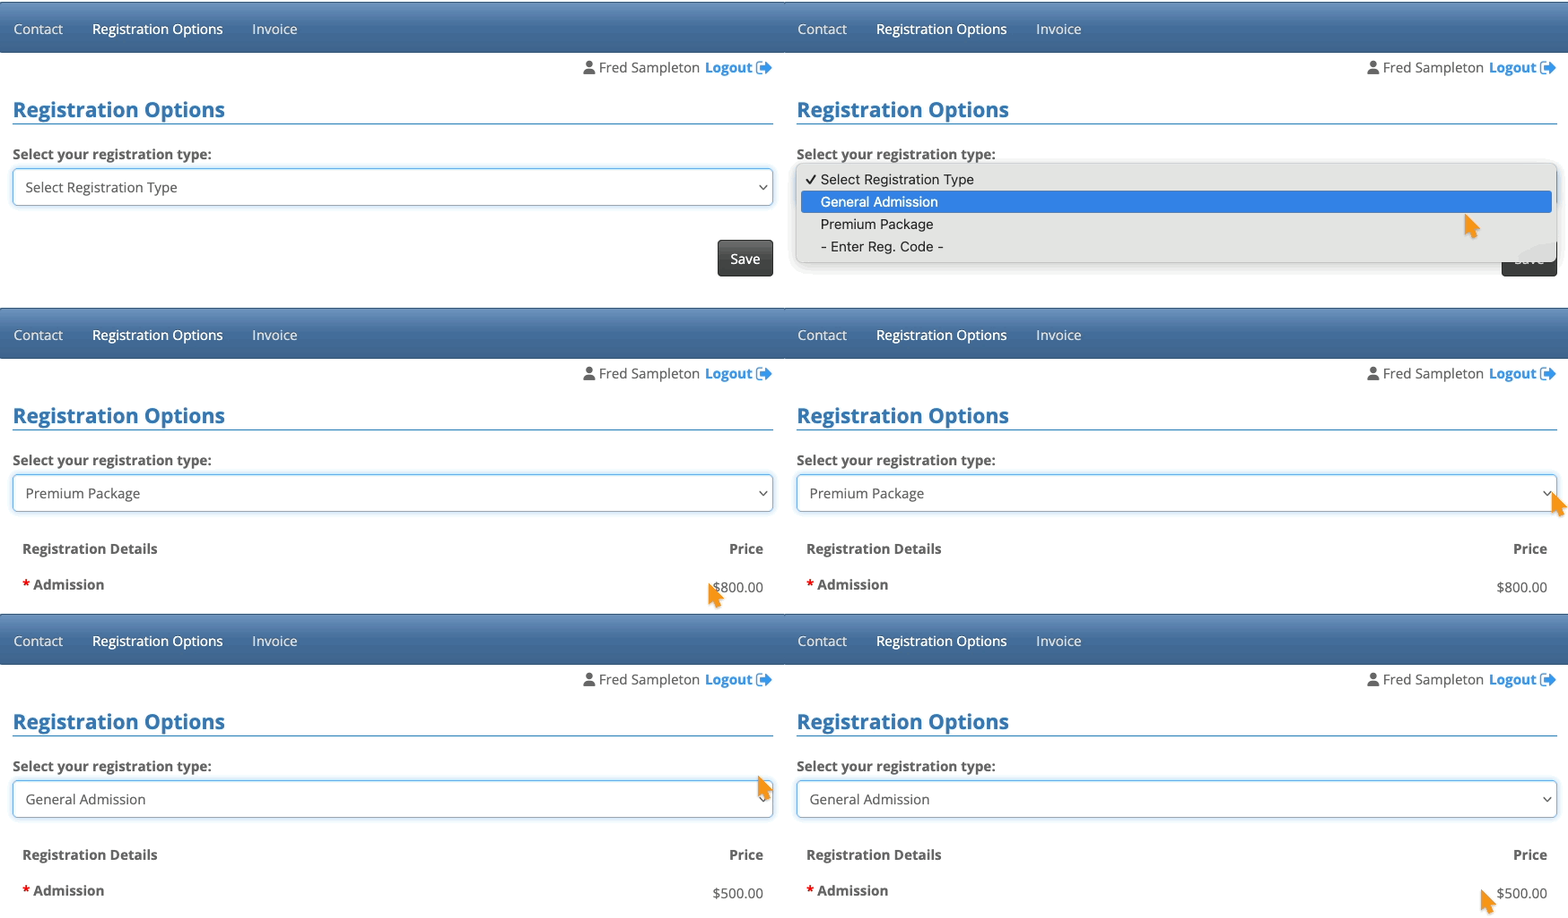
You can, for example, let people choose from a menu of prices while they register for your event:
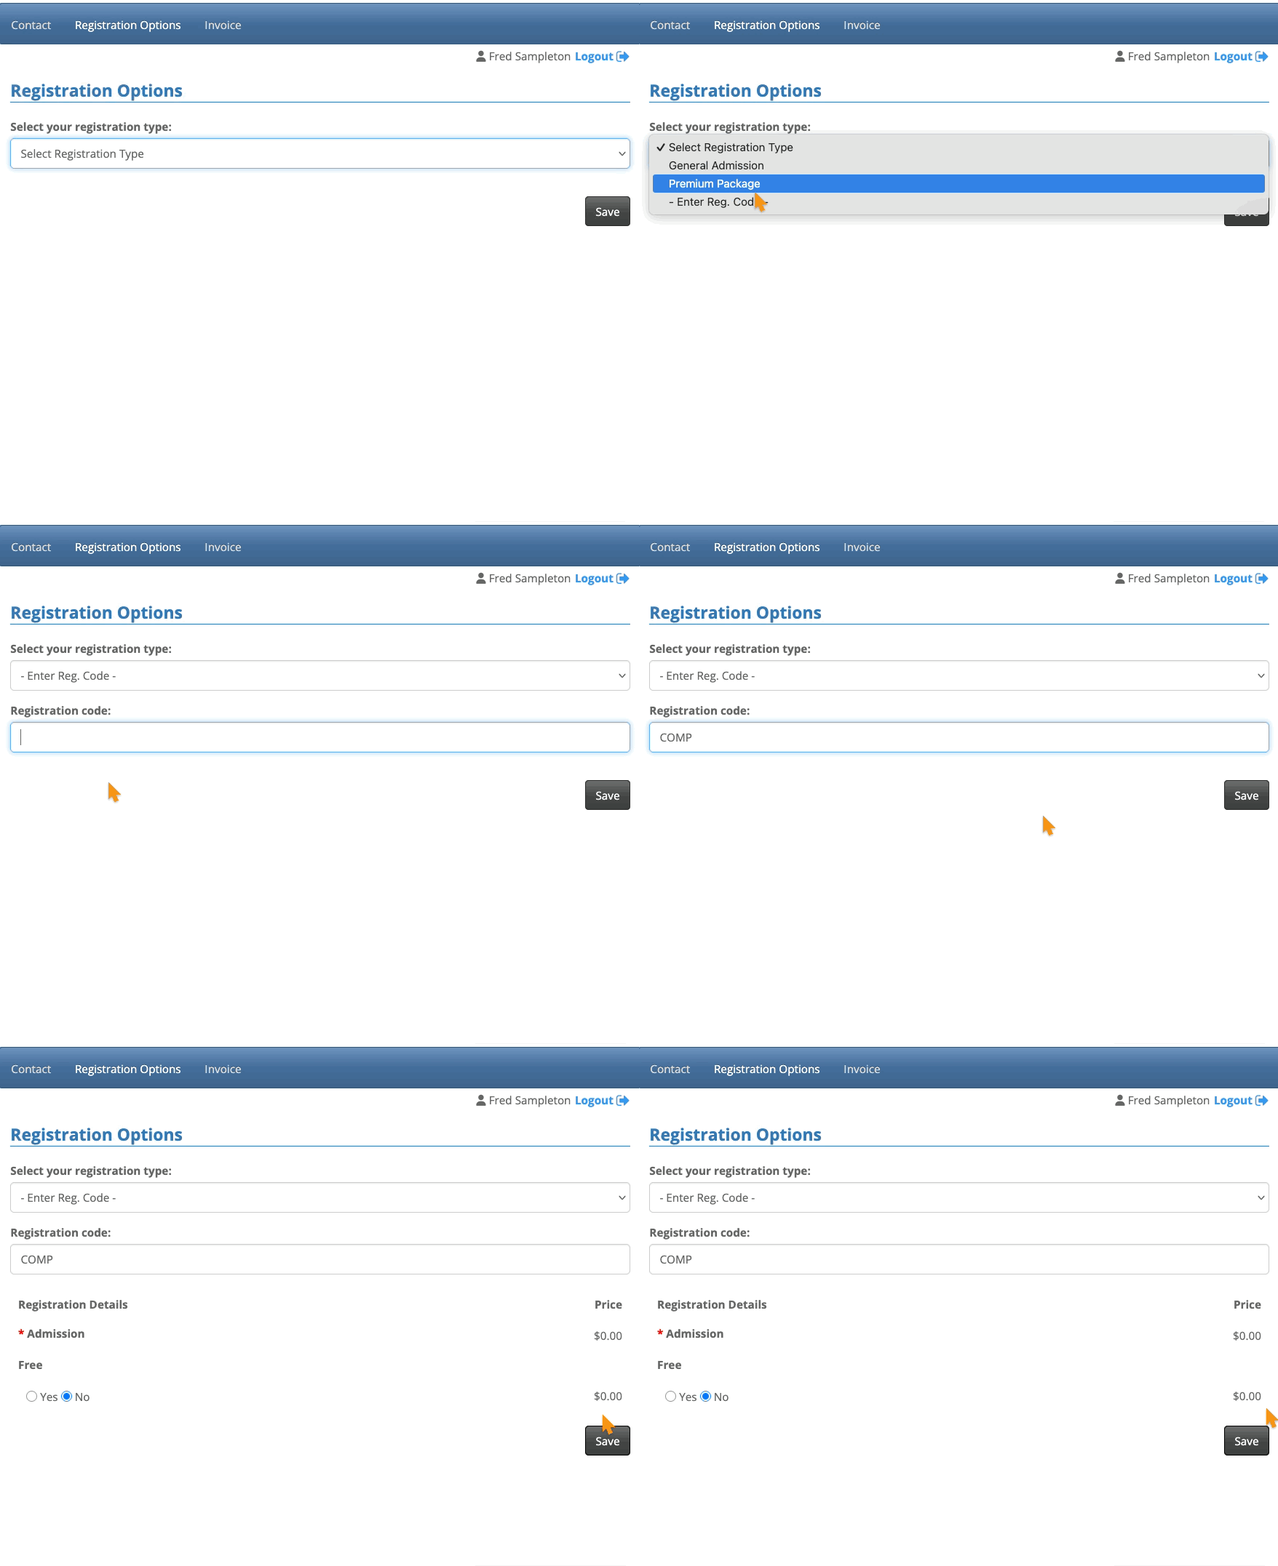
Or, you can give specific people a registration code. When they type it into the registration form, it generates a specific price:
What’s next?
Now that you understand Registration Types, you can:
- Use Registration Options to assign pricing to each of your Types
- Add Pricing Rules to further customize buying options for participants


