Customizing forms for different user roles

Need a form field to be required for Attendees, but hidden for Company Reps? You can assign different visibility to different user roles.
In this article:
Where is it?
You’ll access role options in the Form Editor:

| We’ll show the Attendee form editor here, but this tool is available in all MeetMax forms. |
Accessing the role options
- Step 1. Head to the Configure tab. Choose Form Layout, then Attendee, then Edit Form:

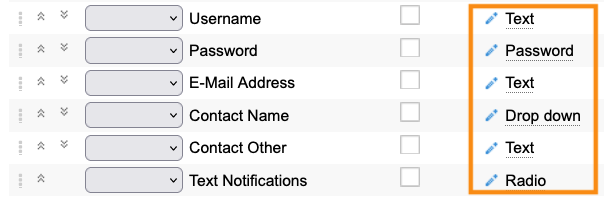
- Step 2. Locate the field you want to update. Go to the Type column and click the Edit icon:
-
If you’re creating a new form field, you can access the role options once you’ve saved the new field. - Step 3. When you click the Edit icon, a pop-up appears. Click the Require/Hide sub-options tab:

-
The User types you have access to here will depend on your event’s setup. Learn more about the MeetMax user roles here.
What options do you have?
Different field types have different ways to customize.
For a Radio or Drop down field, for example, you can make the field:
- Hidden: The roles you select won't see this field.
- Required: The roles you select will be required to use this field.
- Read-Only: The role you select will see this field, but can't change it.

For a Text or Textarea field, on the other hand, you can only make the field Read-Only:

Saving the changes
When you click Submit, that dismisses the pop-up. Be sure to also click the Save button to apply the change to your form.
By default, MeetMax applies these changes to both the Attendee and Admin versions of the form. You can disable that by unchecking the box:


