
In this article:
- Where is it?
- Customizing the print layout
- Setting the print batch size
- Printing a single Attendee schedule
- Printing an Admin version of a schedule
- Printing a group of Attendee schedules
- What if I need PDF copies instead?
Where is it?
You'll first decide on which schedules to print. That happens in the Attendee List:

Once you're in the Attendee List, the schedule printing function is in the top right corner, under Bulk Actions:

| Need details on how to use the Attendee List? Learn more here. |
Customizing the print layout
Once you choose Schedule, you’ll see a pop-up with the Settings button. It appears whether you’re printing one schedule or a batch:

In the Settings pop-up, you can customize what’s included in the printed schedule. Learn more about these customizations here.

| These settings give you great flexibility. You can print or email different versions of schedules to different segments of your participants, throughout your event. |
Setting the print batch size
At the top of the pop-up, you’ll likely also see a row of pages, like this:

| If you’re printing a small batch of schedules, you won’t see these pages. You can skip this section. |
Each of these “pages” is a batch of schedules. By default, MeetMax prints schedules in batches of 20 at a time. At the end of each batch, you’d click on the next page number and then print that batch.
For large events, however, you might want to set larger print batches. In that case, use the Page Size menu to choose batches of 50 or 100 schedules:

| The default batch limit of 20 prevents too much load on your browser processing and network resources. If you choose a larger batch size, it’s possible you’ll experience some performance issues. |
Printing a single Attendee schedule
You can do this two different ways:
Option 1
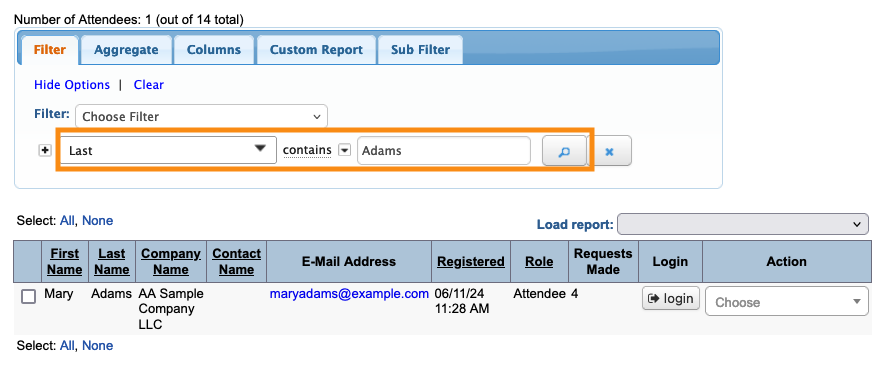
- Step 1. Head to the Attendee List page. Filter the list by last name, so you can narrow it to the single Attendee you need:
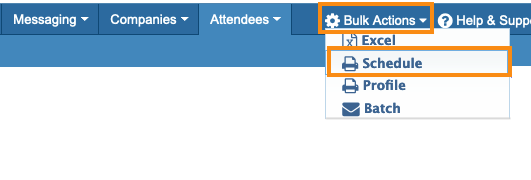
- Step 2. Head to the top right corner of the page. Click on Bulk Actions, then choose Schedule:
- Step 3. A preview of the schedule will pop up. Click the Print button:

Option 2
You can also print an Attendee's schedule from your Admin view of their account.
- Step 1. In the Attendee List, locate the attendee you need.
- Step 2. Use the Action menu to choose Your Schedule:

- Step 3. You’re now in the Admin view of this Attendee’s schedule page.
- Head to the top right corner of the page, and click the Print icon:

Printing an Admin version of a schedule
Sometimes, you might want your own copy of an Attendee’s schedule (or a group of them), with different details than the Attendees see on their copies.
When you access an Attendee’s Your Schedule page from your Admin account (as shown above), you’ll also have access to a separate set of Admin settings.
Use the Admin Settings to customize your copy of the schedule:

Print this version as shown in the section above.
Printing a group of Attendee schedules
You might need to print the schedules of all Attendees, or a specific group of them. You can customize the batch to your needs.
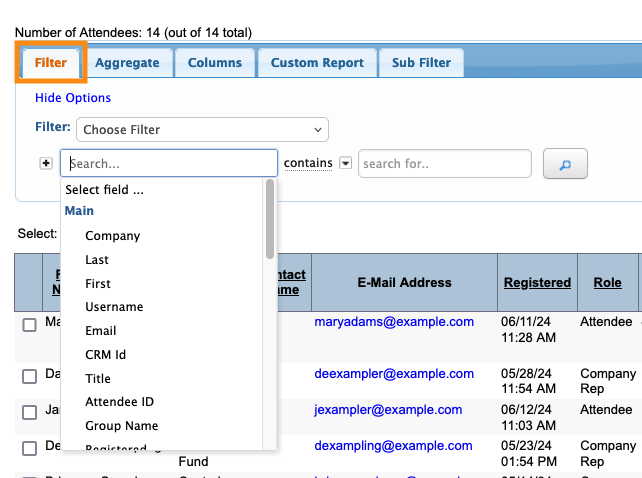
- Step 1. Head to the Attendee List. Filter the list if you need to narrow it down:
- Step 2. When you have the list you need, head to the top right corner of the page. Click on Bulk Actions, then choose Schedule:

- Step 3. You’ll see a preview pop up, where you can scroll through and see all the schedules in the batch.
- Click the Settings button if you need to adjust the print settings. If not, click Print:

- MeetMax prints each schedule on a separate page. If your Attendee List is large, MeetMax will print them in batches, using the batch size you set above. At the end of each batch, you’ll be prompted to print the next one.
What if I need PDF copies instead?
When you send any batch of schedules to your printer, you should see a print settings box with the option to save to PDF instead.

