
In this article:
- Where is it?
- Grouping and list length
- Table or Tile layout
- Filtering options
- Hide Thumbnails
- Request and Message actions
- Hide Bookmark
- Hide Profiles button
- Show categories
- Excel download
- Table Columns tab
Where is it?
| We’re assuming here that you’ve already created your Custom List page. |
Head to the Configure tab and choose Custom Pages:

Use the Action menu to choose List (Edit).
From there, head to the Display Settings tab:

Different settings will make sense for different kinds of Custom Lists. Below, we’ll explain all the options.
Grouping and list length
- Group list by: Use this setting to choose a field from your registration forms (including your custom fields).
The Custom List will then group participants according to their responses:
If the field you’ve chosen is a drop down field, MeetMax will order your Custom List the same way you've ordered the field's options. - Show up to: This menu lets you choose how many records of your Custom List will display per page. In most cases, we recommend using the default 30 option - it allows for faster page loads:

Table or Tile layout
These settings determine the look of your Custom List:
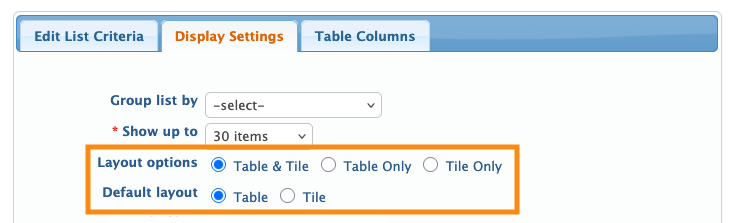
- Table & Tile layout: This setting lets your participants switch between layouts, as shown below. If you’re using this one, use the Default layout setting as well.
- Table Only layout: This option shows only the Table layout.
- Tile Only layout: This option shows only the Tile layout.
If you’re using Profiles, and having participants upload their headshots or logos, the Tile layout is a good option. If not, the Table layout is simpler:

| If you’re using the Table layout, see the Table Columns Tab section below. You can customize what appears in the table. |
Filtering options
By default, MeetMax places a filter tool at the top of a Custom List page. (See the sample below.)
The filter helps your participants locate specific Companies or Attendees:
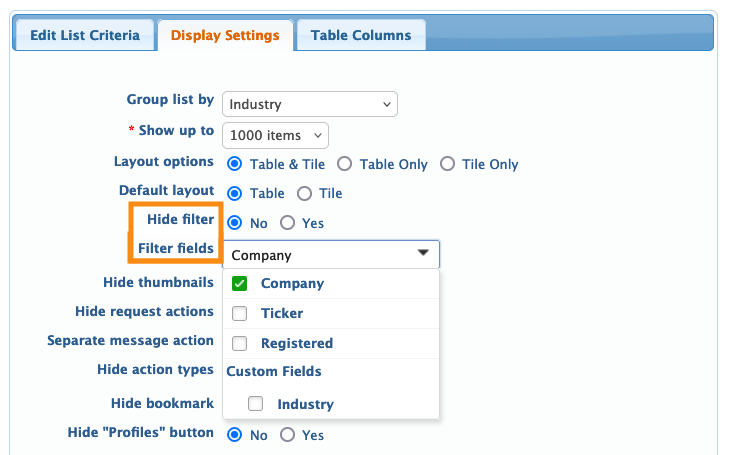
- Hide filter: If you don’t want to display the Filter tool, use this setting.
- Filter fields: By default, the Filter tool filters only by company name. You can add other filter criteria, including custom fields from your registration forms.

Hide Thumbnails
This setting applies to the Tile layout. If your participants are creating Profiles, you can remove logos and headshots from the display, as shown below:

Participants would still be able to click any name to open the full Profile in a pop-up:

Request and Message actions
These settings determine whether you want to integrate your Custom List with your 1x1 meetings program:

- Hide request actions: This setting removes the option to submit meeting requests from this list.
- Separate message action: This setting is for Unmoderated meeting programs, where you’re allowing Attendees to message each other. By default, the Message option is in a drop down menu for each participant.
By default, each person in a Custom List will display either:
- A link to request a meeting
- The date and time of a scheduled meeting
These links appear in both the Table and Tile layouts (see below):


If you prefer, you can hide these options and just display the participants in a list.
Separate message action
By default, the option to Message participants lives in a drop-down menu with the meeting request action.
You can move it to a separate location as shown below:


Hide action types:
This related setting lets you be more specific about what you hide or show:

Hide Bookmark
By default, the Custom List page displays a Bookmark icon for each person, as shown below.
This setting hides that icon:


Hide Profiles button
By default, Custom List pages have a Profiles button, as shown below. It opens a list of all participant profile details.
This setting removes that button. Participants can still click on anyone’s name to open their profile details in a pop-up:


Show categories
This setting works similarly to the Filter tool, but allows more visibility and complexity.
If you’re using many groupings for your participants, you can choose more than one custom form field to display. You can also choose to hide any groups that currently have no participants:

As a result, your participants will have a category list with checkboxes, so they can customize their list display:

Excel download
If you want to give participants the ability to download the Custom List in spreadsheet format, add this setting. It places a link at the top of the page:


The downloaded file can be opened in any spreadsheet software.
Table Columns tab
If you’re planning to use the Table layout for your Custom List, you might want to add or remove columns.
Head to the Table Columns tab. There, you can add and remove columns, just like you would on any List page in MeetMax. Then click Save:


