In this article:
- Where is it?
- Enabling change requests for your event
- Viewing all pending change requests
- Processing a single change request
- Processing a change request for multiple meetings
- Internal and Attendee communications
Where is it?
Once you’ve enabled meeting change requests for your event, you’ll administer them from the Attendee List:


Enabling change requests for your event
- Step 1. Head to the Configure tab. Choose Meeting Settings, then General Settings:

- Step 2. Under Enable change requests, choose Yes.
- Then scroll to the bottom of the page and click Save:

- Step 3. Now, head back to the Configure tab. Choose Site Design, then Menu Editor. Choose the Attendee Menu:

- Step 4. Choose the option that works best for you:
- • If you haven’t done any significant menu customization yet, click the Reset button as shown below. That will restore the Attendee menu to its default, and add the Change Meeting option.
- • If you’ve already done significant menu customization, reach out to our Support team. They can add the Change Meeting option for you without disturbing other menu settings.

Viewing all pending change requests
You can run a report of current change requests at any time.
This report can generate from the Attendee List or the Company List. We’ll show the Attendee List here, but the process is the same for Companies.
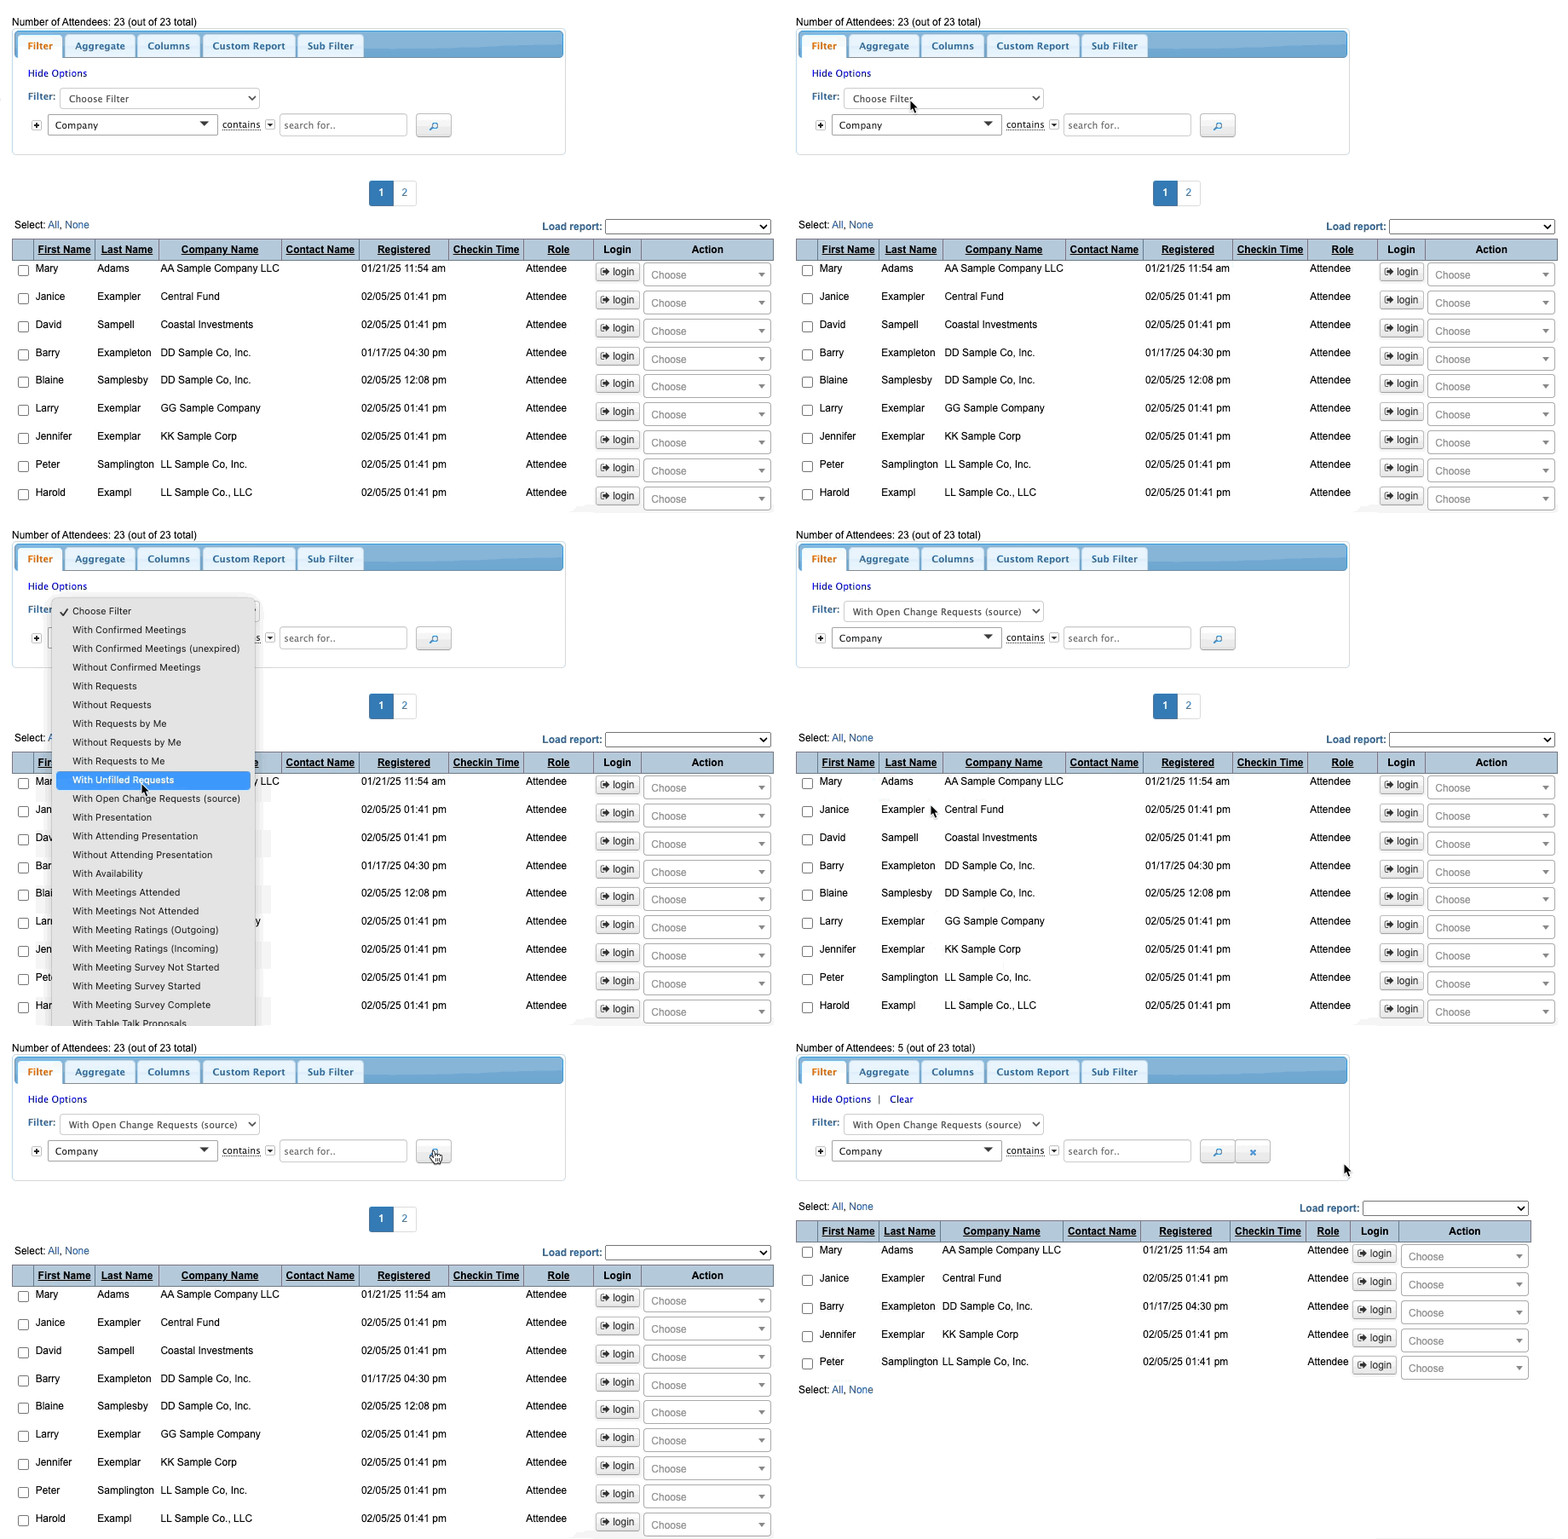
- Step 1. Head to the Attendee List:

- Step 2. In the Filter tab, make sure any other filters are cleared.
- Then, set the top filter to With Open Change Requests (source):

-
In MeetMax, the Source is the person who sent a meeting request. The Target is the person who received that request.
If you ran this report from the Company List, the filter would be With Open Change Requests (target). - Step 3. The resulting list contains everyone who has pending change requests.
- Let’s look at the first Attendee on this list. Use their Action menu, and choose Change Requests:

- Step 4. Below, you’ll see the Admin view of this Attendee’s Change Requests page:

- Some important details:
- • MeetMax arranges change requests by when they were submitted, most recent first.
- • Request #1 above involves a change to one meeting - a reschedule.
- • Request #2 involves changes to three meetings - one cancellation, and two changes of personnel.
| Attendees can't edit change requests, but they can submit multiple requests for the same meeting. |
Processing a single change request
Let’s process Request #1. The Attendee, Mary Adams, needs us to reschedule her meeting with Northern Fund.
- Step 1. In every change request, the Meeting with link takes you to the target Company's Meeting TImes page:

- In this example, clicking that link takes us to Northern Fund’s Meeting Times page. That’s where we’ll change the meeting.
- Step 2. Once you’re on the Meeting Times page, locate the correct meeting. You might need to click a different tab to view the correct event day.
- At the top of the page, you’ll see a Change Requests button. It opens the details of the original request in a pop-up. It’s handy for remembering the request details.
- Step 3. Make the requested change to the meeting.
- Step 4. Click the Change Requests button again. Mark the request as Resolved:

-
Even if there are multiple Attendees requesting meeting changes with this Company, you'll only see the requests that apply to the current Attendee. Once you mark a request as Resolved, it's removed from the With Open Change Requests filters.
Processing a change request for multiple meetings
Let’s look now at the other request in our example. It involves changes to three meetings. (Attendees can submit change requests for multiple meetings at once.)
- At the top of the request, you’ll see the detailed instructions the Attendee submitted.
- Below that, you’ll see a separate Meeting with link for each meeting:

To update each of these meetings, we’ll use the same steps as we did in the section above for the single meeting.
- The Meeting with links take you to each Company's Meeting Times page.
- On each Meeting Times page, you'll see the Change Requests button with all of the instructions.
- When you’ve updated each meeting, click the Change Requests button again so you can mark that part of the request as Resolved:

Back on the Attendee's Change Requests page, we can see which of the meetings we’ve updated. Below, we’ve completed two of the three requested changes.
You can also mark requests as Resolved here:

| The Attendee sees a current status for each request in their account. |
Two ways to stay organized
These tools are very helpful for working on grouped change requests.
- Change Requests Report: You can export a report of all current change requests. That gives you a reference for the details of each request.
- Opening links in new tabs: Alternatively, you can open the Meeting With links in new browser tabs. (If you right-click on a link, you can choose this option as shown below.)
That way, you can still reference the original meeting change request, while updating the meetings in separate tabs.

Internal and Attendee communications
While you’re working on change requests, you can communicate with the Attendee and your internal team.
Both options are available in every Attendee’s Change Requests page:

Adding internal notes
The Add Note button opens a pop-up, where you can add messages for your internal team (or reminders for yourself):

Your team can see all internal notes, with most recent at the top:

Messaging the Attendee
Sometimes, you’ll need to communicate with an Attendee about their request.
Click the Message Attendee button, and you can email them directly:


