
In this article:
- Where is it?
- Who’s on the Company List?
- Adding, removing, and reordering columns
- Sorting and filtering Companies
- Creating custom reports
- Exporting from the Company List
Where is it?
The Company List is in the Companies tab:

The list appears as soon as you’ve added or imported some Companies to MeetMax.
Who’s on the Company List?
This list contains the organizations that are participating in your event. Each Company has one or more main company contacts associated with it.
Company Reps, on the other hand, appear on your Attendee List.
| If you’re doing Invitee registration, each invited Company will appear on the Company List as soon as they’ve accepted and registered. |
In this article, we’ll cover the basics of working with Company List data. See the links at the bottom of the article for even more useful things you can do.
Adding, removing, and reordering columns
Head to the Company List:

The default view contains only some of the available details. You can add and remove data to reflect exactly what you need.
Click on the Columns tab. There, you can add new columns to the list, or remove some. Be sure to click the Apply button afterward:
Need to change the order of columns? Click on any column name to highlight it. Then use the arrows to move it up or down. Click Apply to save:

Sorting and filtering Companies
When you have a large Company List, you’ll need ways to locate specific organizations quickly.
Sorting links
Look at the titles on each column. Some of them are links.
Click on any of these, and that sorts the whole list by that column. Click again to switch between ascending and descending order:

Filter tab
In the Filter tab, you can narrow down the display using a variety of criteria.
The default filter, Company, narrows the list by company name. You can type in a whole name or part of it:
You can filter even further. Click the + button to add another criteria:
Need to remove a filter? There are two ways:
- Click the X button to remove one filter
- Click Clear to clear all current filters
![]()
| Company List filtering goes even deeper than this! Learn more about the Selected filter, Sub Filters and Aggregates. |
Other standard Company filters
You can also use the Filter menu to choose filters related to 1x1 meetings. These come in handy as you’re building your event's meeting schedule:
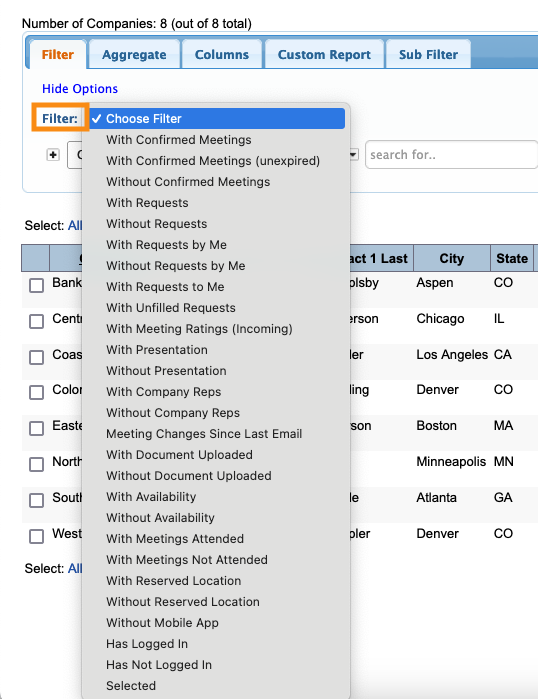
Here are some of the most-used filters:
- With Confirmed Meetings: Companies that have meetings scheduled
- Without Confirmed Meetings: Companies that have no meetings scheduled
- With Requests: Companies that have received meeting requests
- Without Requests: Companies that haven’t received any meeting requests
- With Company Reps: Companies that have added their Company Reps
- Without Company Reps: Companies that haven’t yet added Company Reps
- Meeting Changes Since Last Email: Companies whose meeting schedules have changed since you last emailed them
- With Document Uploaded: Companies that have uploaded files to MeetMax
- Without Document Uploaded: Companies that haven’t uploaded any files
- With Availability: Companies that have available time for meetings
- Without Availability: Companies that have no available time for meetings
Creating custom reports
If you’ve created a Company List view that you’ll want to access later, you can use the Custom Report tab to save it:

For any event, you'll have specific data you need to reference continually. You can create as many reports as you need.
Once you’ve saved some custom reports, you can access them from the Company List, using the Load Report menu. You’ll see your custom reports there, along with a few commonly-used default reports:

When you’re ready to switch back to the main view, use this menu to choose Standard Layout.
Exporting from the Company List
You can export any Company List view in spreadsheet format. The export will contain only the data in your current filter/sort.
Head to the top right corner of the page. Choose Bulk Actions, then Excel:

You can open the exported file in any spreadsheet software.
What’s Next?
Now that you’re familiar with using the Company List, you can:

