


In this article:
- Where is it?
- Enabling the report
- Identifying the Hedge Funds
- Cleaning your data for this report
- Millennium format
- Point 72 format
- Citadel format
Where is it?
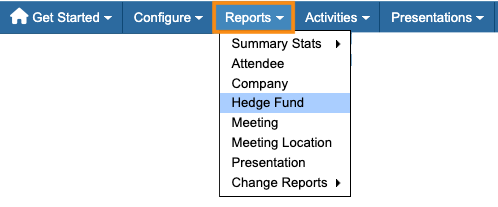
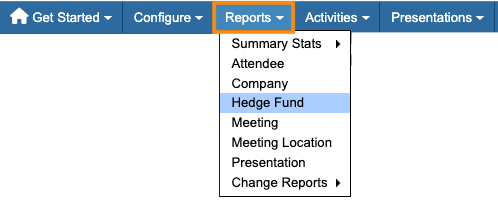
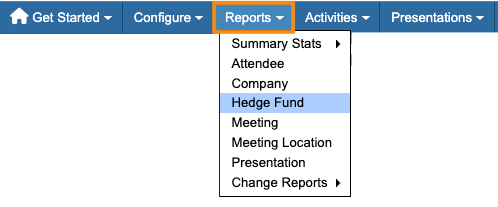
Once it’s enabled for your event, you’ll find the Hedge Fund report in the Reports tab:
Enabling the report
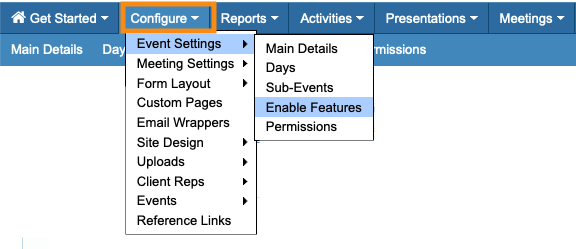
- Step 1. Head to the Configure tab. Choose Event Settings, then Enable Features:
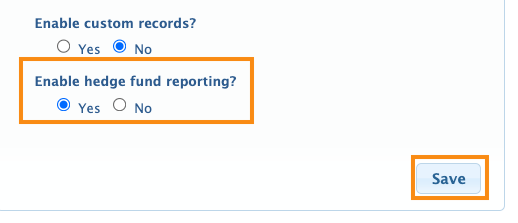
- Step 2. Scroll to the bottom of the page. Set Enable Hedge Fund Reporting to Yes.
- Step 3. At the bottom of the page, click Save:
Identifying the Hedge Funds
For this report, you’ll need to add a custom field to your Attendee registration form. It should be a drop-down field that lets you organize your Attendees into groups by their type of company.
You can structure this field for the needs of your event, but here’s a general example:
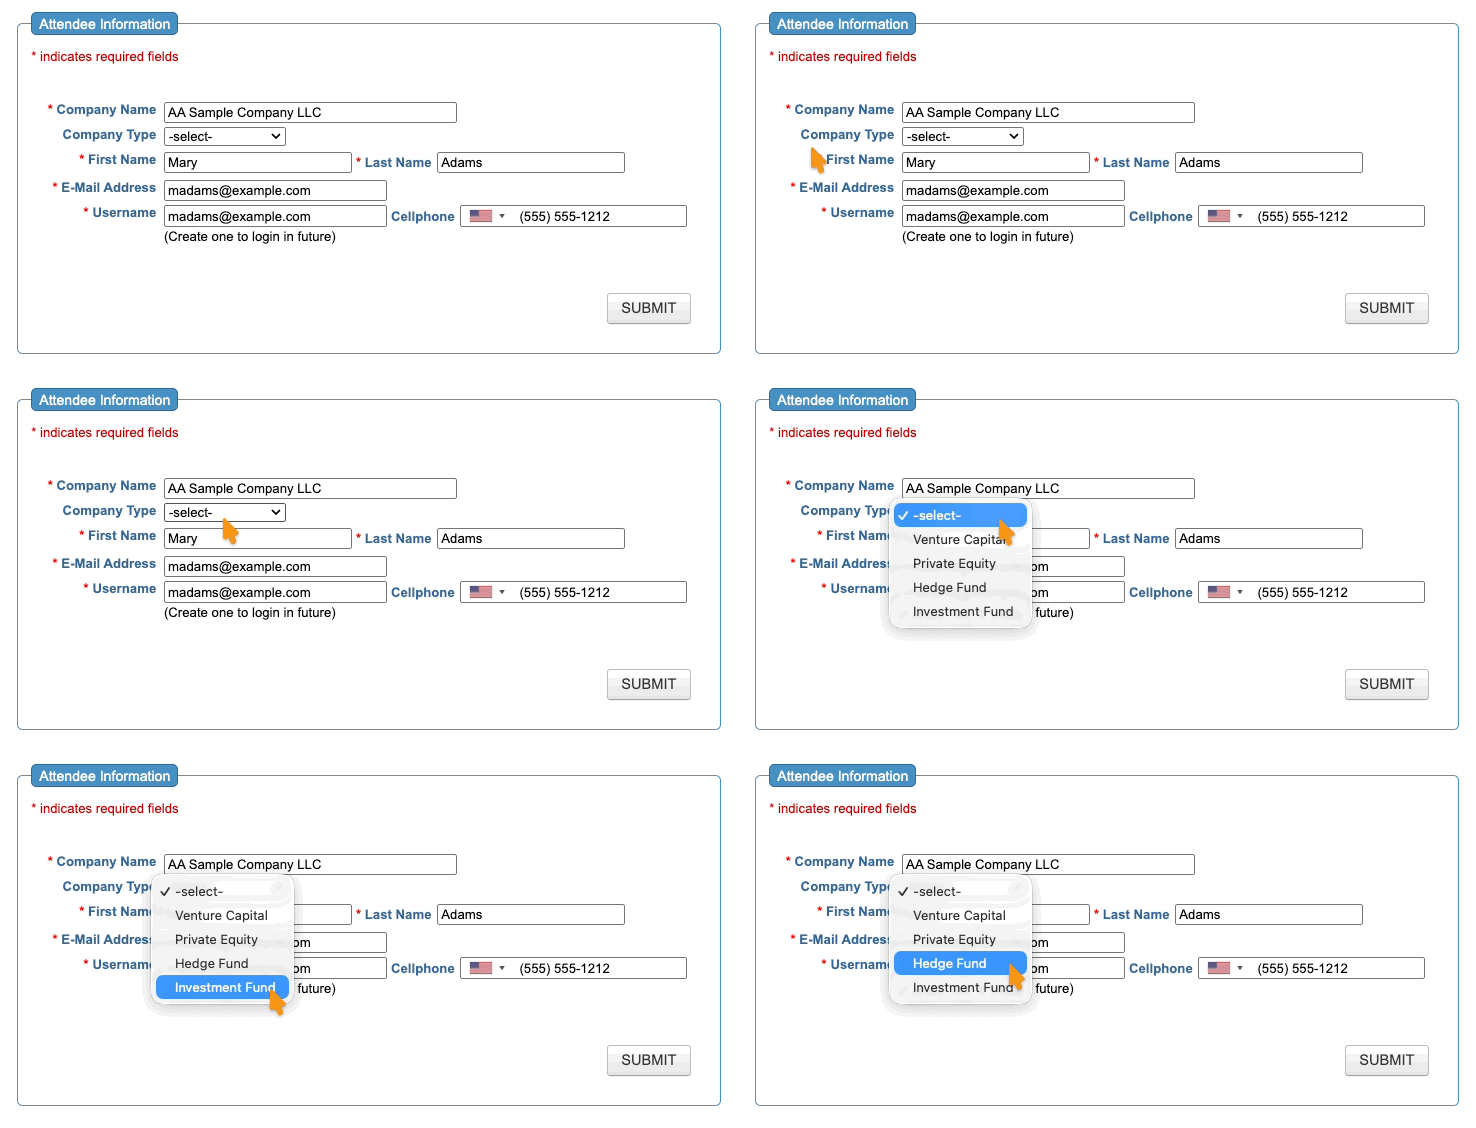
In this field, one choice should be Hedge Fund.
- You can add this field to your public registration form and let Attendees choose their company type while registering.
- You can add the field to the Admin version of the form, and have your internal team organize Attendees into groups.
Cleaning your data for this report
To get the best reporting, it’s important to have complete, clean data in MeetMax. This includes:
- Adding decline reasons to declined meeting requests.
- Adding cancellation reasons to cancelled meetings. (You can also do this after canceling.)
- Merging any variants of company names (as shown below).
- Mapping the fields the Hedge Fund requires to fields in your MeetMax event (as shown below).
You can still run the Hedge Fund report without taking these steps, but it will be missing records and/or columns of data.
Cleaning up company names
Attendees sometimes register for your event under various forms of their company name.
MeetMax counts each variant as a separate company, and that will affect the accuracy of your Hedge Fund Report.
Take these steps before running your report.
- Step 1. Go to your Attendee List:

- Step 2. Export your Attendee List in spreadsheet form.
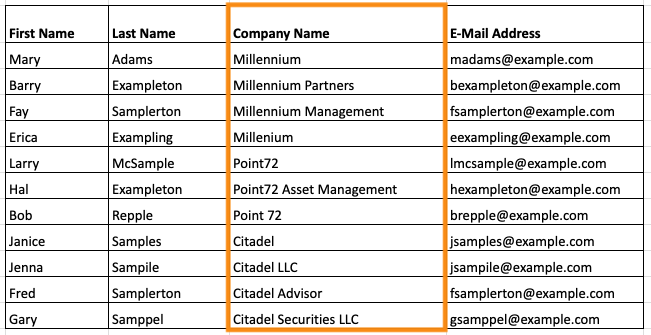
- Step 3. In the spreadsheet, sort the data by the Company Name column. Check for variants of the same Company Name, like the sample below:
-
Misspellings and extra spaces also count as variants. - In the example above, we have 11 Attendees representing 3 Hedge Funds. We just need to merge all these company name variants.
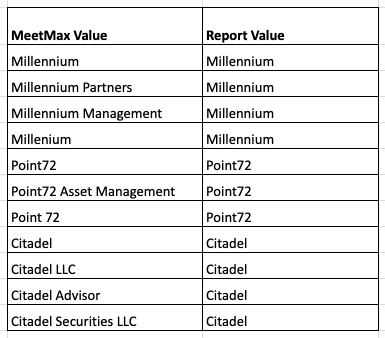
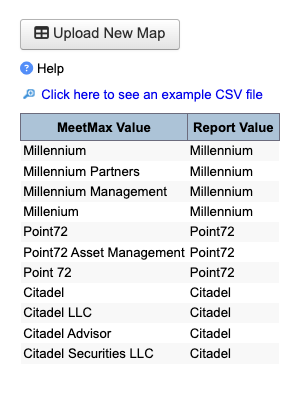
- Step 4. Set up a simple spreadsheet like the sample below. Use the same column names.
- This will be your mapping document, connecting all the name variants to one official name you’ll use in your reporting:
- Step 5. Export this spreadsheet as a CSV file. Be sure to use UTF-8 encoding.
- Step 6. You’ll now upload this map to MeetMax. We’ll use it as the foundation for all future Hedge Fund Reports.
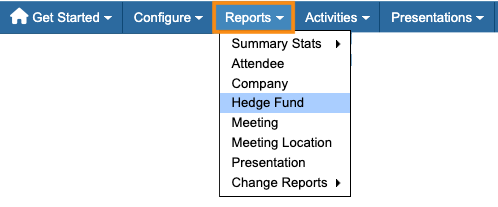
- Head to the Reports tab. Choose Hedge Fund:
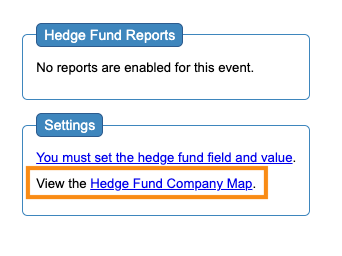
- Step 7. Click the Hedge Fund Company Map link:
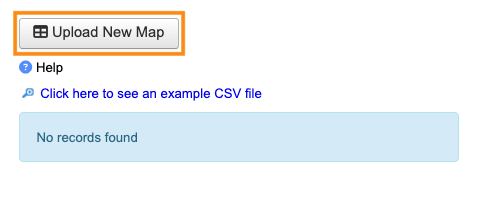
- Step 8. Click the Upload New Map button:
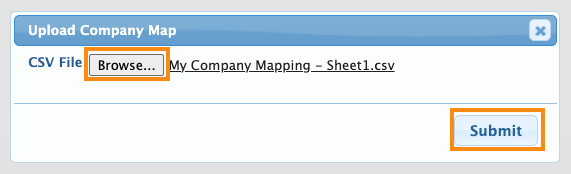
- Step 9. Click the Browse button, then locate the CSV file on your computer.
- Click Submit to start the upload:
- Step 10. You’ll now see your map on this page. You’re ready to run reports:
-
Once you upload your map, it applies to all of your events.
If you need to update the map in future, repeat these steps to upload a new version over the old one.
Using the 3 report formats
Below, we’ll cover three formats for the Hedge Fund Report: Millennium, Point 72, and Citadel.
When you run this report:
- You can choose any single format.
- You can run any two formats simultaneously.
- You can run all three formats simultaneously.
Each format has different data and mapping needs. See the instructions for each below.
| If you work with other Hedge Funds and would like to have reporting available, please let our Support team know. |
Millennium Report
- Step 1. Head to the Reports tab. Choose Hedge Fund:
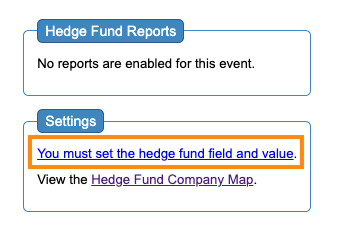
- Step 2. To start the report, click the link to Set the Hedge Fund field and value:
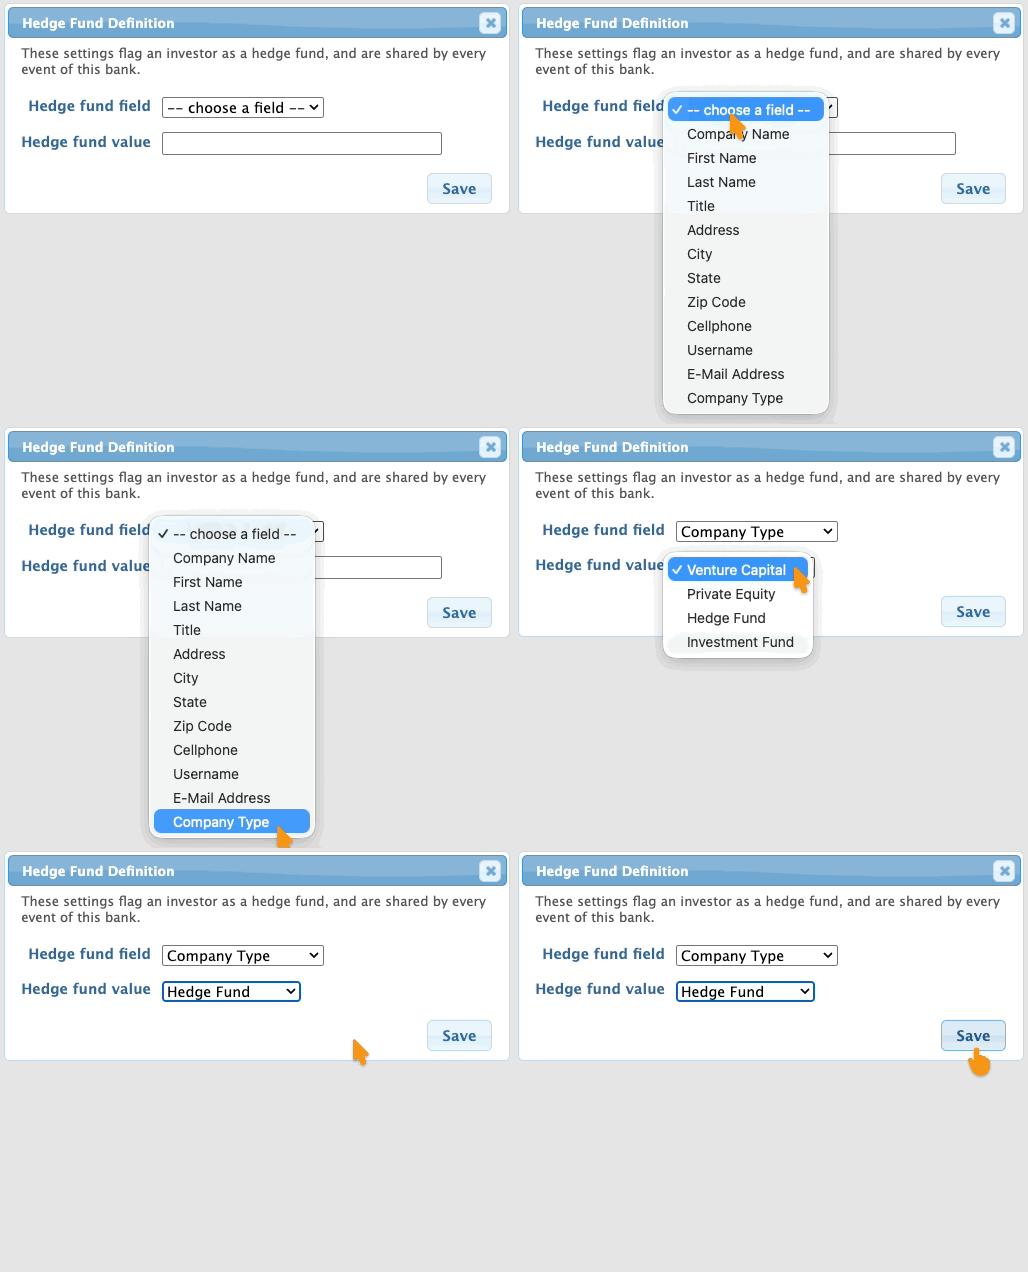
- Use the menus to choose:
- • Hedge fund field: The custom form field you set up to capture company types.
- • Hedge fund value: The response option that designates a company as a Hedge Fund.
- Be sure to click Save:
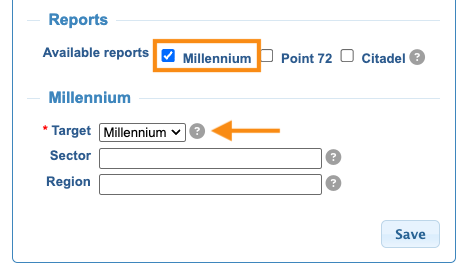
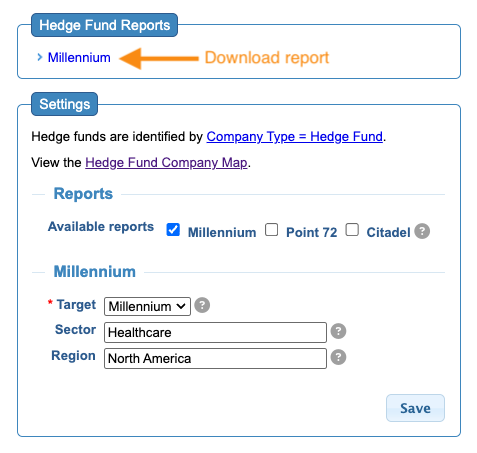
- Step 3. Click the Millennium checkbox.
- This reveals the Target menu. Millennium should already be selected:
-
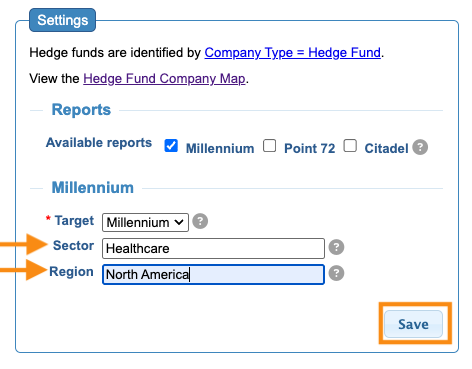
You don't have to choose Millennium here. If you want to use the Millennium report format to create a report for a different company, choose that company name instead. - Step 4. Fill out these two optional fields:
- • Sector: Type in a sector name. It appears in the report heading.
- • Region: Type in a region name. It appears in the report heading.
- Click Save:
- Step 5. The link to download the report now appears at the top of the page. Click it to download the report in spreadsheet format:
Point 72 Report
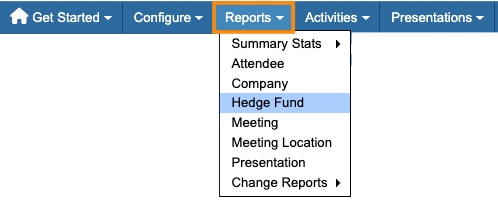
- Step 1. Head to the Reports tab. Choose Hedge Fund:
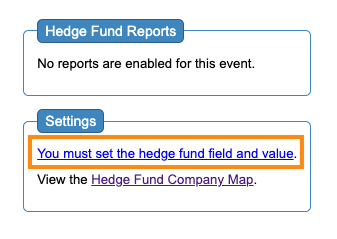
- Step 2. To start the report, click the link to Set the Hedge Fund field and value:
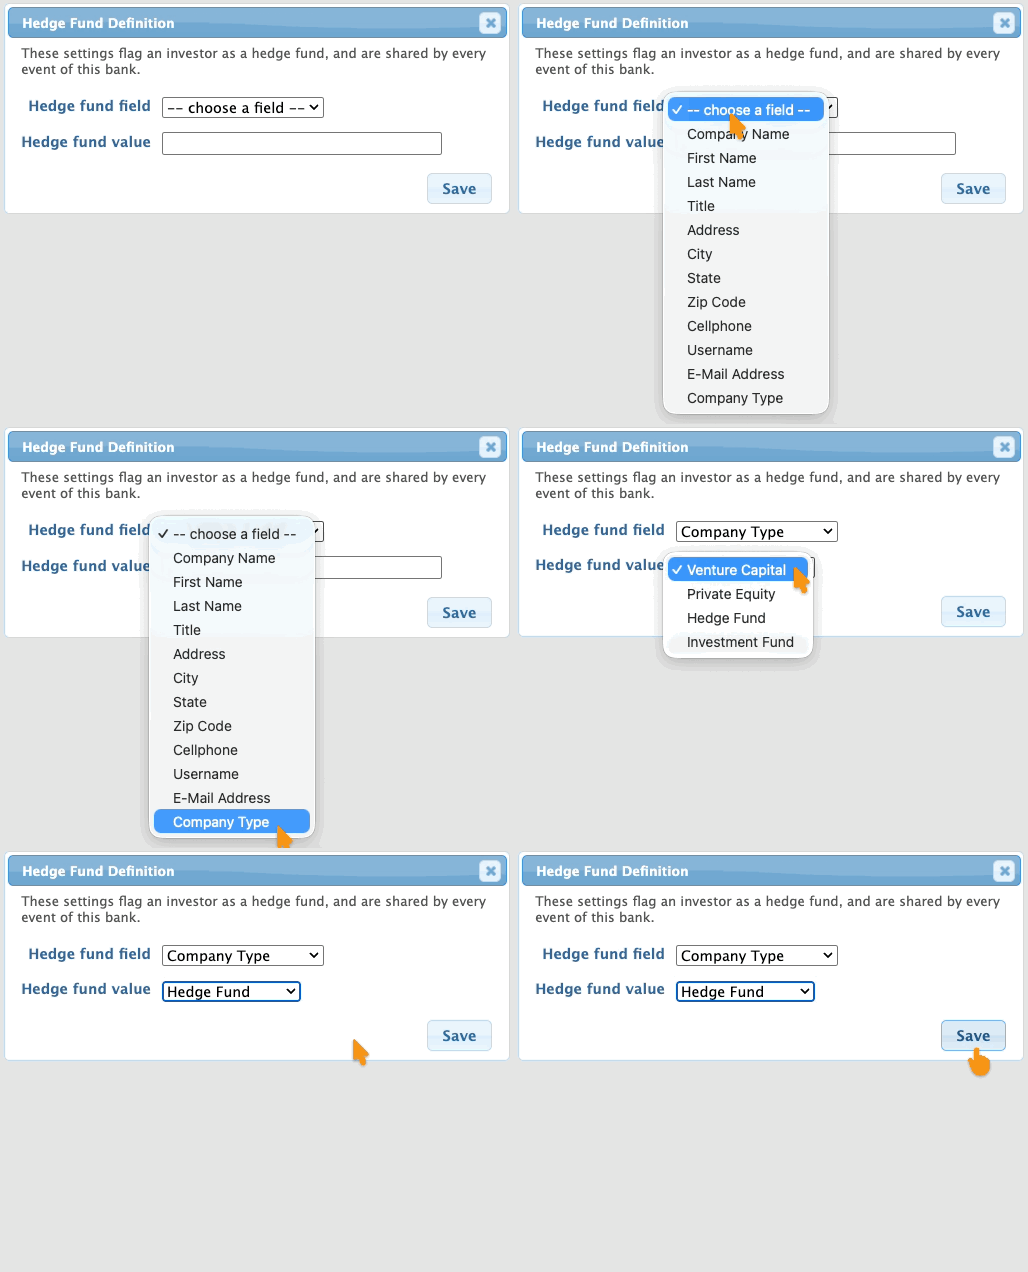
- Use the menus to choose:
- • Hedge fund field: The custom form field you set up to capture company types.
- • Hedge fund value: The response option that designates a company as a Hedge Fund:
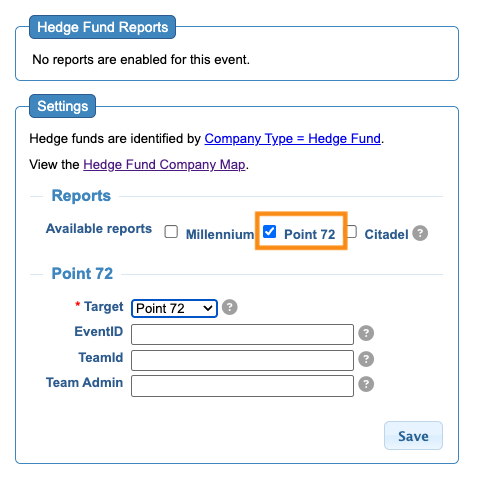
- Step 3. Click the Point 72 checkbox.
- This reveals the Target menu. Point 72 should already be selected:
-
You don't have to choose Point 72 here. If you want to use the Point 72 report format to create a report for a different company, choose that company name instead. - Step 4. Fill out these optional fields:
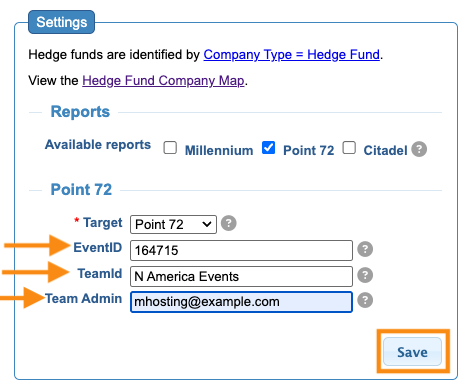
- • EventID: Type in an event name (or other identifier). It populates a column in the report. If you leave this blank, the report will default to your MeetMax event ID number.
- • TeamID: Type in a team identifier. It populates a column in the report.
- • Team Admin: Enter an event admin email address. It populates a column in the report.
- Click Save:
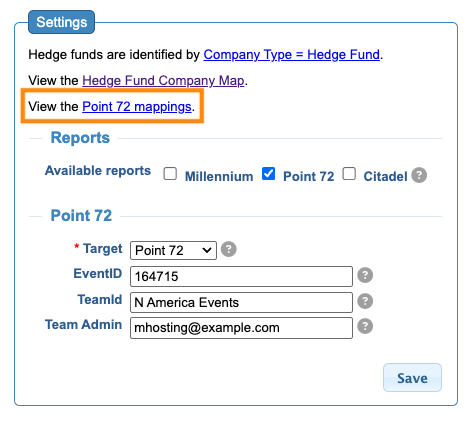
- Step 5. After saving, click the Point 72 Mappings link:
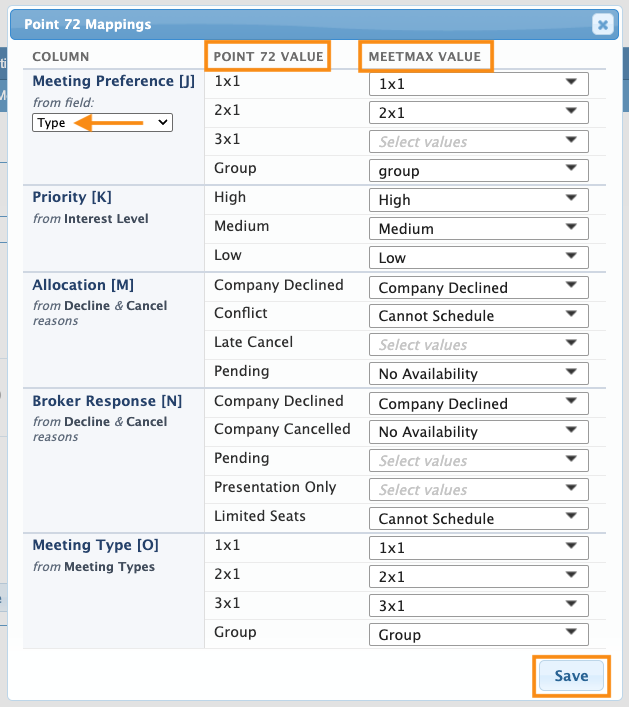
- Step 6. In the pop-up, you’ll map a series of key criteria.
- • In the left column, you’ll see Point 72’s preferred field values.
- • In the right column, choose the MeetMax field responses to match each one.
- Step 7. Use the Meeting Preference section if requestors at your event will indicate the type of meeting they’d like to request. (If your event isn’t using this option, skip this step.)
- You’d have a field in your event’s Source request rating form, where a requestor would make that choice.
- If you’re using a field like this, choose it from the Meeting Preference menu:
-
For some Point 72 fields, you might not have an equivalent in MeetMax. It’s fine to leave these fields unmapped. - This mapping is divided into sections. See the table below for an explanation of each one:
-
Section: Relates to: Meeting Preference Type of meeting requested - 1x1, 2x1, Group, etc. Priority Interest Level (from the meeting request rating form) Allocation Request decline reasons, and/or Meeting cancellation reasons Broker Response How your team handled the request: decline or cancel Meeting Type Type of meeting that was scheduled - also 1x1, 2x1, Group, etc. -
Request Declines and Meeting Cancellations
- When you’re mapping fields in the Allocation and Broker Response sections, you’ll notice that the menu of MeetMax fields has two sections:
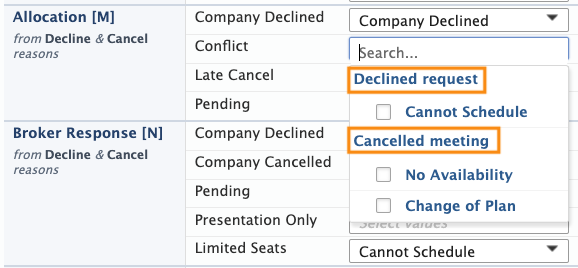
- Whenever possible, choose both a Decline reason and a Cancellation reason. That allows MeetMax to use the correct status in mapping:
- • When no meeting was scheduled, MeetMax uses the Request Decline reason.
- • When a meeting was scheduled, MeetMax uses the Meeting Cancellation reason.
-
Once you complete this mapping, it applies to all of your events. - Step 8. After you finish the mapping process, click Save again.
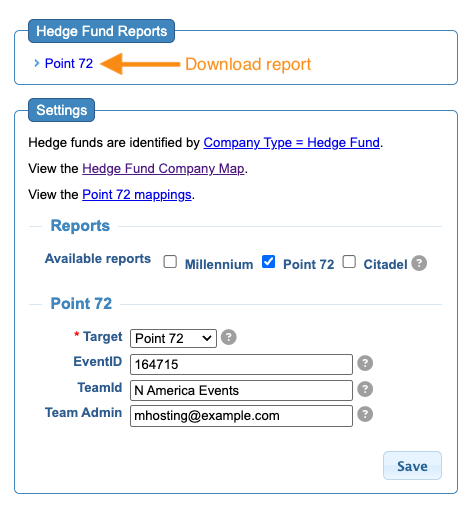
- Step 9. After saving, at the top of the page you’ll see the report’s download link:
-
You’ll see the report’s download link before you start mapping. You can run the report at that point, but it will be missing data until you map.
Additional columns in the Point 72 report
In the downloaded report, these two columns are left blank. You can add notes as needed:
- Requestor Comment
- Broker Comment
If you’re publishing this event to Corpaxe with our integration, MeetMax can populate these two report columns:
- Management Attendee (uses the assigned Corpaxe rep titles)
- Ticker
Citadel Report
- Step 1. Head to the Reports tab. Choose Hedge Fund:
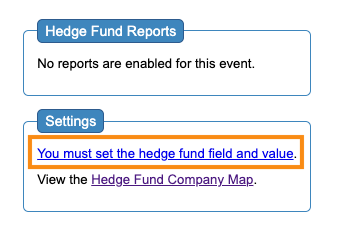
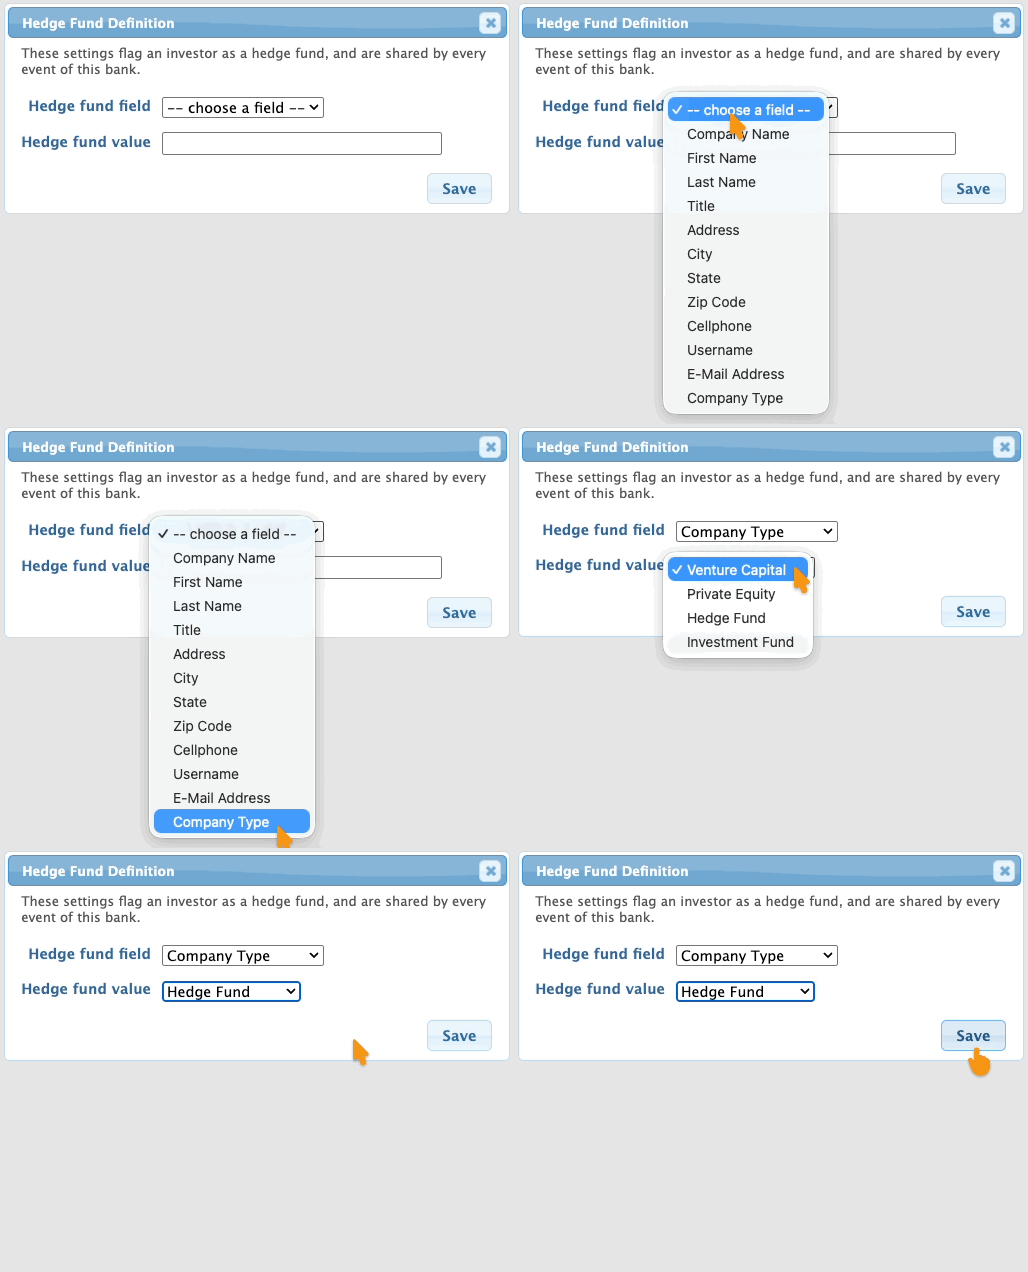
- Step 2. To start the report, click the link to Set the Hedge Fund field and value:
- Use the menus to choose:
- • Hedge fund field: The custom form field you set up to capture company types.
- • Hedge fund value: The response option that designates a company as a Hedge Fund:
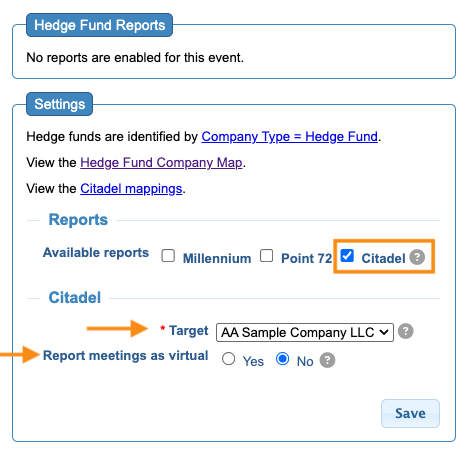
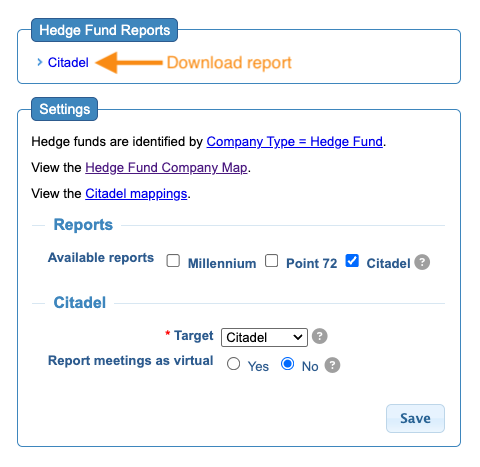
- Step 3. Click the Citadel checkbox. This reveals two fields:
- • Target: Citadel should already be selected.
- • Report meetings as virtual (optional): Set to Yes if you want to designate all meetings on this report as virtual. Set to No if all meetings are in-person.
-
You don't have to choose Citadel in the Target field . If you want to use the Citadel report format to create a report for a different company, choose that company name instead. - Click Save:
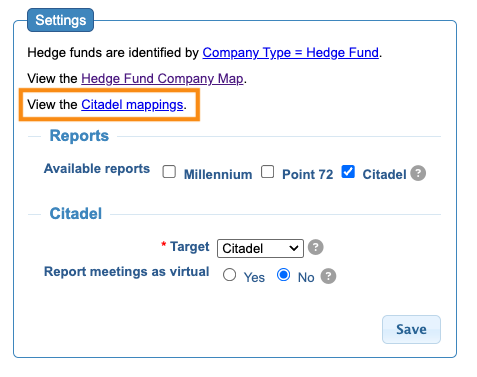
- Step 4. After saving, click the Citadel mappings link:
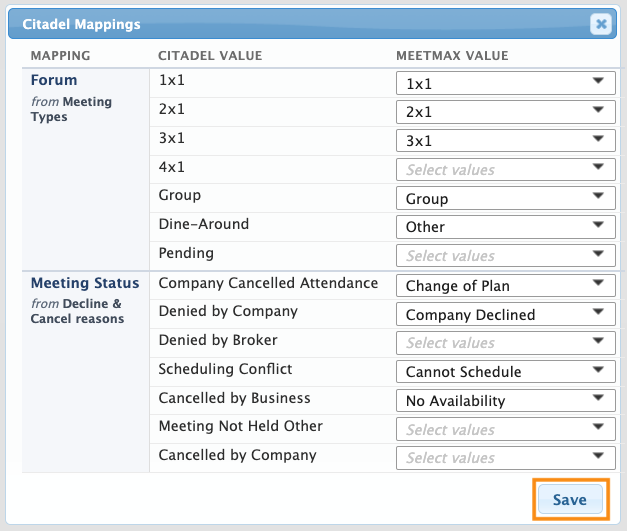
- Step 5. In the pop-up, you’ll map a series of key criteria.
- • In the left column, you’ll see Citadel’s preferred values.
- • In the right column, choose the MeetMax field responses to match each one:
-
For some Citadel fields, you might not have an equivalent in MeetMax. It’s fine to leave these fields unmapped. - This mapping is divided into sections. See the table below for an explanation of each one:
-
Section: Relates to: Forum Type of meeting requested - 1x1, 2x1, Group, etc. Meeting Status Request decline reasons, and/or Meeting cancellation reasons -
Meeting Status
- When you’re mapping in the Meeting Status section, you’ll notice that the menu of MeetMax fields has two sections:
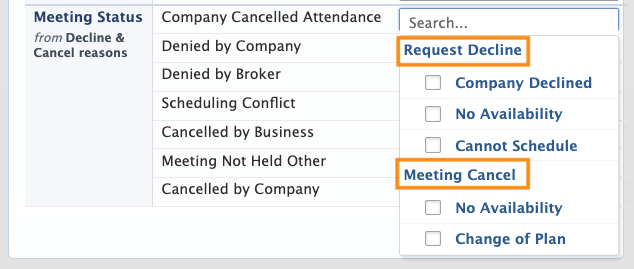
- Whenever possible, choose both a Decline reason and a Cancellation reason. That allows MeetMax to use the correct status in mapping:
- • When no meeting was scheduled, MeetMax uses the Request Decline reason.
- • When a meeting was scheduled, MeetMax uses the Meeting Cancellation reason.
-
Once you complete this mapping, it applies to all of your events. - Step 6. After you finish the mapping process, click Save again.
- Step 7. After saving, at the top of the page you’ll see the report’s download link:
-
You’ll see the report’s download link before you start mapping. You can run the report at that point, but it will be missing data until you map.
Additional columns in the Citadel report
If you’re publishing this event to Corpaxe with our integration, MeetMax can populate these two columns:
- Title (uses the assigned Corpaxe rep titles)
- Ticker

