
In this article:
- Where is it?
- When is it useful?
- Enabling Batch Meeting Pairs
- Setting up a batch
- Refining the pairings
- Running the batch
- Troubleshooting
- Importing a batch
Where is it?
Once you’ve enabled it for your event, you’ll find this feature in the Meetings tab:

When is it useful?
This feature is useful when you need to create meetings between pairs of participants, without having them request the meetings first.
Here are two examples:
- In a “Round Robin” type of event, you might have buyers and sellers. You want every buyer to meet with every seller. The Batch Meeting Pairs feature creates those meetings automatically.
- Let’s say your event is a startup conference, and your participants make up several groups: investors, entrepreneurs, and manufacturing reps. In your event’s registration form, you’ve collected data on which entrepreneurs want to meet with investors specifically. Batch Meeting Pairs let you create meetings for only this group.
| This feature works differently from our other automated scheduling. To use our automated scheduler, you'd need to have meeting requests in place. To use Batch Meeting Pairs, you don't need any meeting requests. | |
| Our Support team is happy to help you with this feature. |
Enabling Batch Meeting Pairs
- Step 1. Head to the Configure tab. Choose Meeting Settings, then General Settings:

- Step 2. Scroll down to Enable batch creation of meetings, and choose Yes:

- Step 3. If you want MeetMax to assign a location to each meeting it creates, add this setting:

- If you don’t want to use this setting, you can add locations later using the Assign Location Grid.
- Step 4. Scroll to the bottom of the page and click the Save button:

Setting up a batch
At this point, you’re ready to create pairings. That’s the foundation MeetMax will use to create meetings.
Every batch of pairings has a Side A and a Side B.
- Step 1. Head to the Meetings tab. Choose Batch Meeting Pairs:

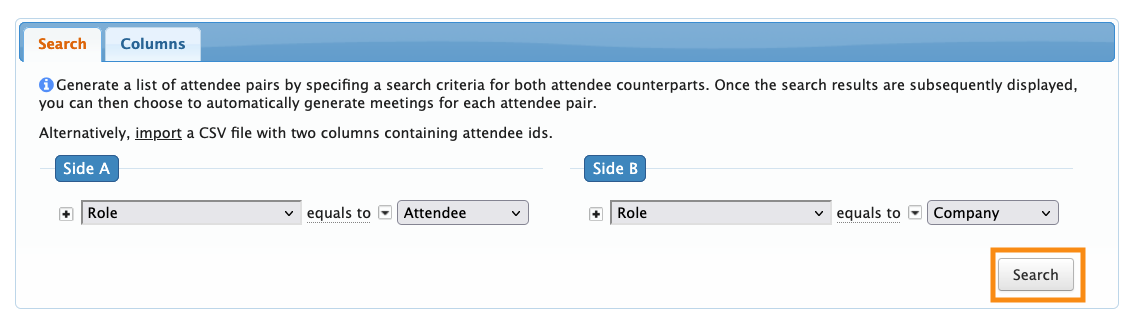
- Step 2. Let’s use a simple example: an event where we want every Attendee to meet with every Company.
- Attendees will be Side A, and Companies will be Side B.
- We’ll set up a Role filter for each side:

- Step 3. Click the Search button to start the pairing:
Using the Side B filters
You might notice that Side B’s filter menu has two sections: Main and Side B:

- Always use the Main section for your first filter.
- The Side B section is optional, for subsequent filters. It lets you base a Side B filter on a Side A filter.
More complex example
Below, we’re using two filters on each side.
We’ve added a custom field to the Attendee and Company registration forms, to identify each participant’s industry. That way, we can pair people based on those groups:

Refining the pairings
When the search has finished processing, you’ll see a page with two sections.
No meetings have been created yet! At this point, you can see how people are being paired up, and add more settings to refine those pairings:

In the top section, you’ll find these additional settings:

- Max Num. Meetings: By default, MeetMax creates one meeting for each participant in this batch. You can set that to a higher number if you need.
- Order By: These two settings control the order of the Side A and Side B lists in the lower section of this page.
- Add Attendees to Group Meetings: If participants in the Side B column have group meetings enabled, MeetMax will include them in this batch, and add participants according to your Meeting Type Rules.
- Spread Meeting Times: MeetMax can schedule meetings sequentially, starting with your first time slot. Or, MeetMax can spread the meeting times around.
- Join Colleague Meetings: If your event has multiple people from the same company attending, MeetMax can automatically include all of these colleagues in the same meetings.
Making adjustments to filters
In addition to these settings, you might find that you want to make adjustments to your initial set of filters.
There are two ways to do this:

- Change Results: This button takes you back to the filters you initially set. You can adjust them or add more.
- Restart: This button removes your original filters so you can start the batch over.
Adding limits on meetings
Finally, you might also want to use the Limits tab. This is where you control how many meetings MeetMax can create.
In this example:
- We want no meetings on the first and last days of our event.
- We want to limit the meeting count on the second and fourth day.
- The third day can have any number of meetings, so we’ll leave it blank.
Running the batch
When you have all the settings you need in place, click the Run button:

| MeetMax takes everyone’s availability into account while creating meetings. | |
| With this feature, you’ll work with one set of pairings at a time. So in our example above, if you wanted every entrepreneur at your event to meet with every investor, you’d run one batch. If you also wanted every entrepreneur to meet with every manufacturing rep, you’d run a second batch. |
Depending on the number of meetings, it might take a few minutes to run the batch. Once it’s complete, you’ll see a message like this:

- MeetMax shows how many meetings it created.
- You can click on the Batch ID number to see the details of those meetings.
- Below the message, you’ll see a list of all pairings where MeetMax wasn’t able to create meetings.
If you notice that MeetMax didn’t create as many meetings as you were expecting, proceed to the next section.
Troubleshooting
MeetMax starts with your filters and settings. Then it overlays your event’s available time slots and each participant’s availability settings.
So while there might be a pairing in place, MeetMax might not be able to create the meeting.
Here are some things to investigate:
- Do both participants have available time slots in common?
- Is either participant scheduled for presentations or activities in these common time slots?
- If you manually scheduled some meetings before running this batch, are these participants already scheduled to meet?
| If none of these explain why the meeting wasn’t created, our Support team is happy to help with more investigation. |
You can always click the Change Results button to access your filters and settings again.
Make adjustments, then click the Run button again to process another batch of meetings.
Exporting the pairings for manual changes
As an alternative way to troubleshoot, you can export the remaining list of pairings and make manual adjustments.
To export the current list, head to the top right corner of the page and click the Excel link:

You can open the downloaded file in any spreadsheet software. Once you’ve made changes, you can re-import it. See the section below for details on that.
Importing a batch
- You can use this import after making manual adjustments to create more meetings (as shown above).
- Alternatively, if you’d rather not work with the filters to create pairs, you can create your own pairings in the spreadsheet outside of MeetMax. Then you can import them and run the batch.
- Step 1. Make sure your spreadsheet is in the correct format for import.
- You can either export a copy of existing pairings, as shown in the section above, or use this sample format:

- Step 2. When your spreadsheet reflects the pairings you want, export it in CSV format.
- Then, return to the Batch Meeting Pairs page:

- Step 3. Click the Import link:

- Step 4. You’ll be prompted to choose the CSV file from your computer. Then click Next:

- Step 5. You’ll be prompted to map fields next. You only need to map these two. Then click Import Now:

- Step 6. You’ll now see the imported pairings on the Batch Meeting Pairs page.
- Proceed with the steps in the Running the batch section above.
What’s next?
Once MeetMax has created all the meetings you need, you can:

