Adding a single presentation

Add your event’s presentations and panels to MeetMax. Participants will sign up to attend, and see those presentations on their schedules.
In this article:
- Where is it?
- Three methods to add presentations
- Adding a single presentation
- Adding a pop-up description to a presentation
- Adding internal notes to a presentation
Where is it?
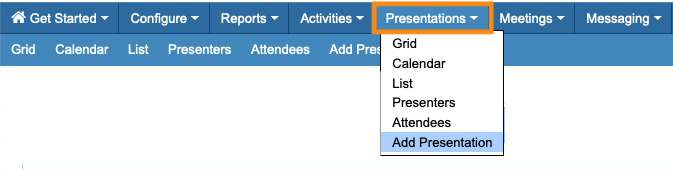
You'll add presentations from the Presentations tab:
| By default, only Companies can be presenters. If you need Company Reps or Attendees to also be presenters, reach out to our Support team. | |
| If your event will also use 1x1 Meetings and/or Activities, you might want to enable our conflict management tools. |
Three methods to add presentations
Feel free to choose the method that best fits your needs. You can use these interchangeably.
- Adding presentations individually: The method we’re covering here is useful when your event contains presentations of different lengths and types. It’s also great for adding supplemental presentations.
- Adding presentations via the Calendar page: A faster method that lets you also visually work out your schedule.
- Importing presentations: If your event has a large number or presentations, this is a time-saving option.
Adding a single presentation
- Step 1. Head to the Presentations tab, and choose Add Presentation:

- Step 2. Give the presentation a Title. Add a Room location.
- The first presentation you add, you’ll type in the room name. MeetMax saves this room to reuse:

- When you add future presentations, you’ll have a drop down menu of all the rooms you’ve added, and you can add new ones any time:

- Step 3. Next, choose whether this presentation will Span rooms – or, prevent other presentation rooms from being booked during this time slot:

- For example, if you choose Yes here, the presentation will look like this on the presentation grid. No other presentations can be booked alongside this keynote:

- If you choose No, the presentation grid will look like this. You could book another presentation at the same time as this keynote:

- Step 4. Add the date, time, and duration of this presentation.
- Then, choose a Type. Learn more about Types and Type Labels here.

- Step 5. Next, there’s a group of optional fields:

- • Track: Use this if you’re creating multiple presentation tracks.
- • Is Draft: Set this to Yes if you need to revisit this presentation's settings.
- • Is Universal: Set this to Yes if you want this presentation to automatically appear on all participants’ schedules. For a keynote presentation, like we’re creating here, you’d likely use this option.
- • Capacity: If the presentation has a maximum number of attendees, include that here. Then MeetMax will prevent sign-ups after that point.
- Step 6. Will this presentation have a Breakout session afterward? Clicking Yes lets you set the time, duration and location:

- Step 7. Add a Description of the presentation. Attendees will be able to see this information.

- Step 8. Finally, you’ll assign one or more Presenters to this presentation.
- If the presentation is a panel, you can also designate a moderator here:

- Step 9. Click Submit to save!
-
You can customize the layout of the Presentations page participants see.
Adding a pop-up description to a presentation
You can also add an optional detailed description and image to any presentation.

What’s next?
Now that you’ve added presentations, you can:
- Use the Grid view
- Use the Presentation and Presenters Lists
- Your Attendees can now sign up for presentations
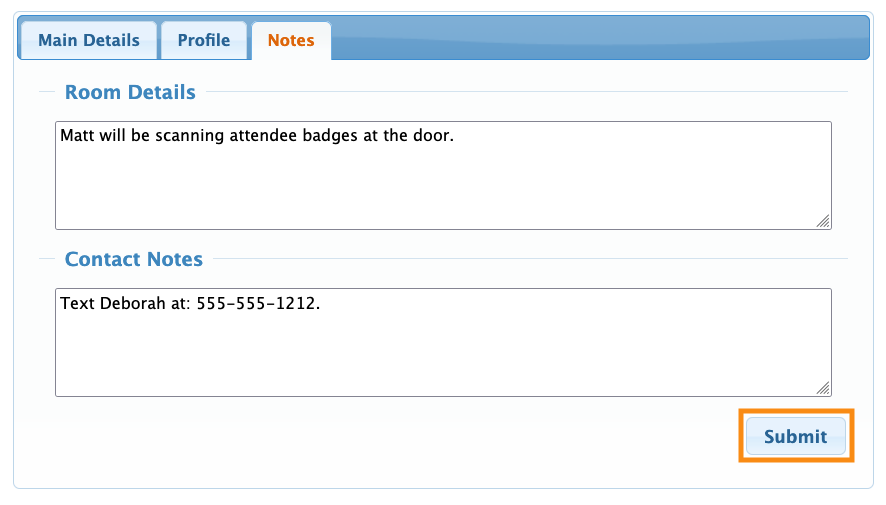
Adding internal notes to a presentation
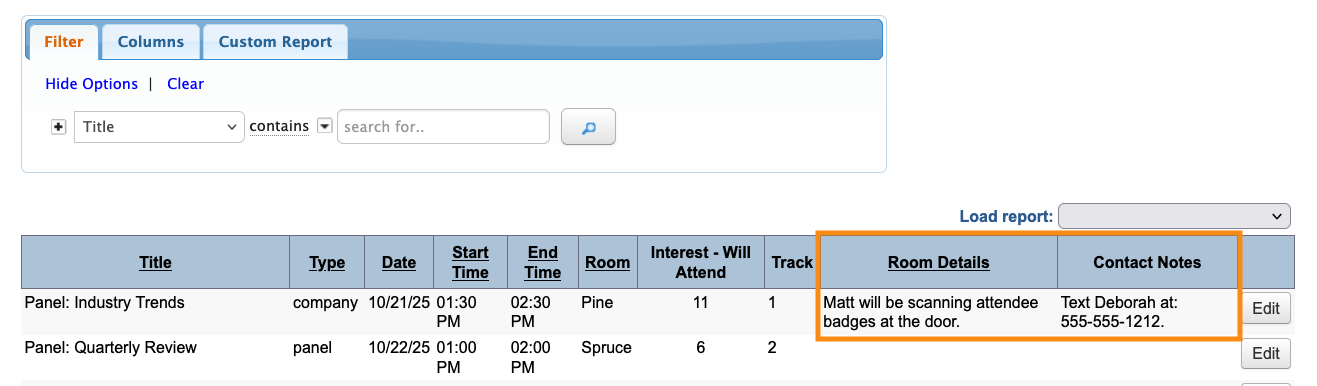
Your team might want to keep notes on specific presentations. The Notes tab has two useful fields:
- Room Details
- Contact Notes
Information you enter here appears in the Presentations List: