In this article:
- Where is it?
- Enabling schedule approval
- Granting Approver permission to individuals
- How approvals affect participant schedules
- What the Approver sees
- How Admins work with schedule approvals
- Tracking pending approvals
Where is it?
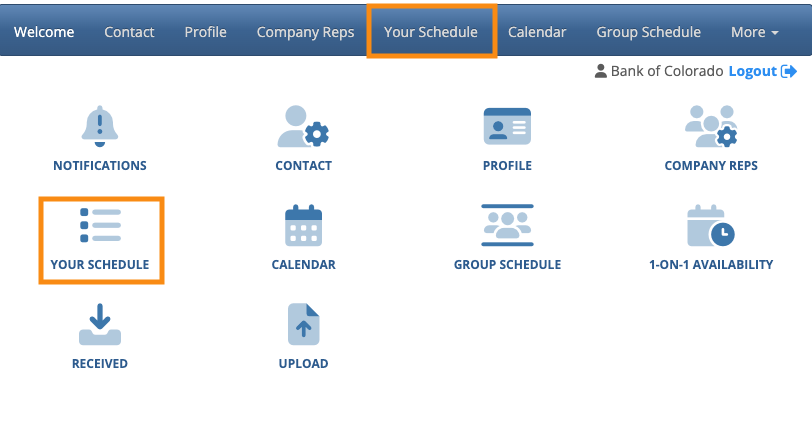
Once you’ve enabled this feature, anyone with the Approver permission can log into MeetMax and head to the Your Schedule tab. That’s where they’ll approve their schedule:

Your Admin team will work with approvals from the Company List or Attendee List:


Enabling schedule approval
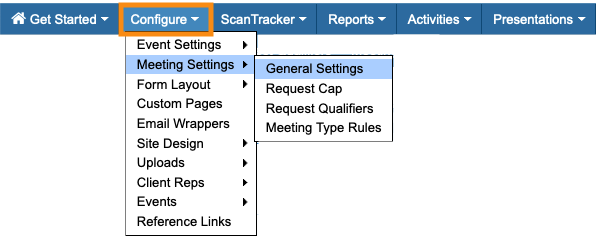
- Step 1. Head to the Configure tab. Choose Meeting Settings, then General Settings:
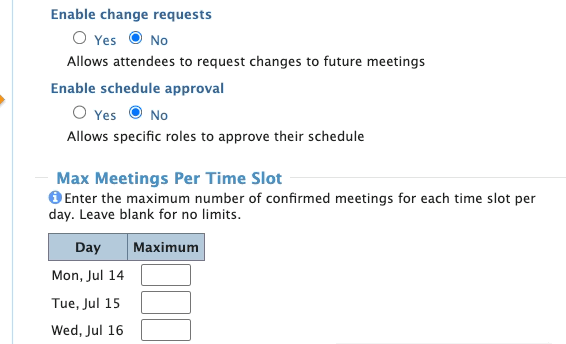
- Step 2. Under Enable Schedule Approval, choose Yes.
- A menu will appear. Choose which role(s) will have schedule approval permissions:
-
In this article, we’ll grant Approver permission to Companies. But you can grant this permission to any other user type. You can grant Approver permission to multiple roles at once. Keep in mind that this can create more work for your Admin team. See the section below for more details. - Step 3. Scroll to the bottom of the page and click Save:

Granting Approver permission to individuals
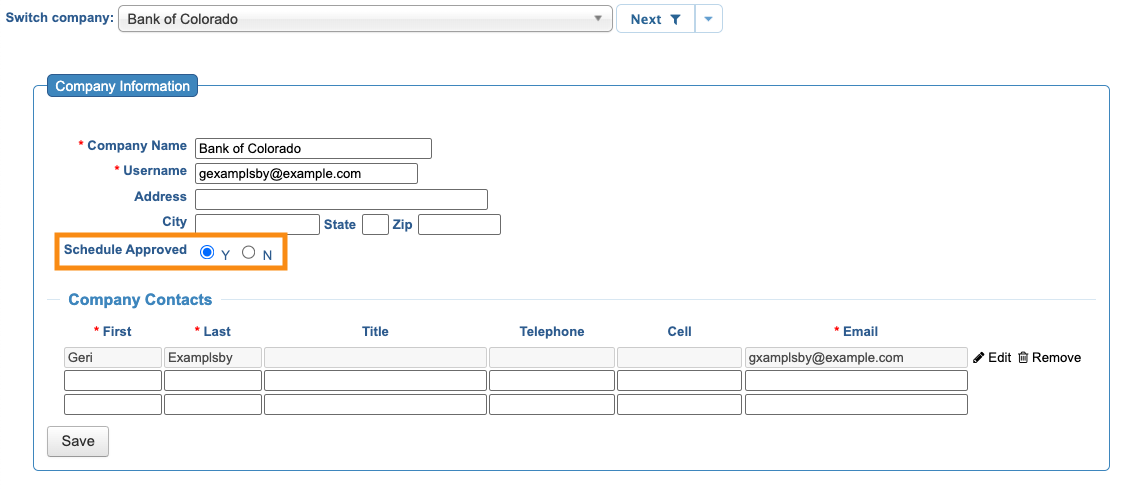
For some events, you might want to give Companies the Approver permission, but then exclude certain Companies from that permission.
To do this, you’ll add the Schedule Approved field to the Admin version of your Company registration form:
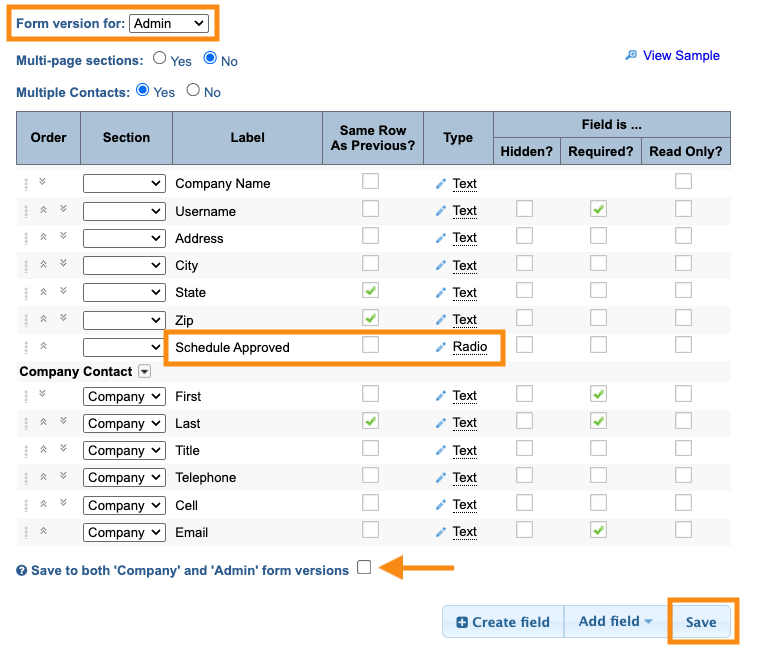
Think of this field as an “auto-approval.” If you don’t want a Company to approve their schedule, set this field to Yes. That way, their schedule will be approved by default, and they won’t see an approval option:
How approvals affect participant schedules
When you enable this feature, Approvers and Non-Approvers will see their schedules differently:
- Approvers always see all of their scheduled meetings, before and after they approve them.
- Non-Approvers will only see meetings as they’re approved.
This means a Non-Approver’s schedule will be constantly updating, until the point where all Approvers have completed their approval step.
| As always, MeetMax prevents scheduling conflicts, even before a meeting is approved. | |
| If a meeting has more than one Approver scheduled into it, that meeting won’t be visible to other participants until all Approvers have approved. |
How approvals affect the Admin view of schedules
When you access your Admin view of any participant’s Your Schedule page, you’ll see a menu to toggle between the Admin view of the schedule, and the participant view:

In this example, we’re looking at a Company schedule.
- If this Company has Approver permissions, the Admin and Company views here will be the same - all meetings will be visible regardless of approval status.
- If this Company does not have Approver permissions, the Admin view will show all meetings. The Company view will only show approved meetings.
When to share schedules
You’ll need to be sure that all schedules are approved before you print or email them. (Otherwise, participants could get incomplete schedules.) See below for details on tracking pending approvals.
You might also opt to hide the Your Schedule tab in all participants’ MeetMax accounts, until everything’s approved.
Or alternatively, you can allow participants to see their schedules developing as Approvers submit their approvals.
What the Approver sees
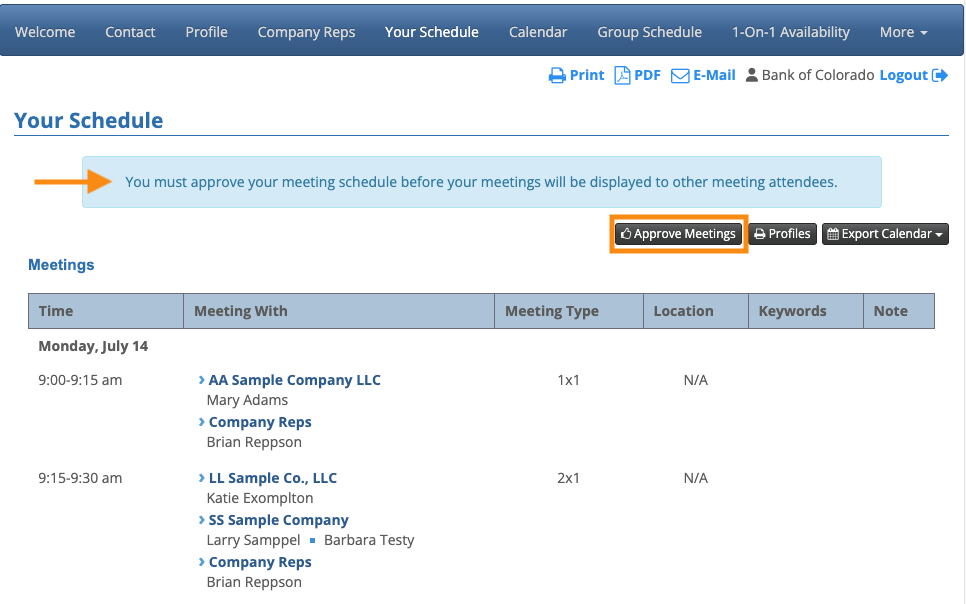
Since Companies have approval permission in this example, any Company can log into MeetMax and go to the Your Schedule page:
| This page will be branded for your event, and contain the menu options you’ve enabled. |
The Approver will see a warning banner here until they’ve approved the schedule.
To approve, they’ll click the Approve Meetings button:
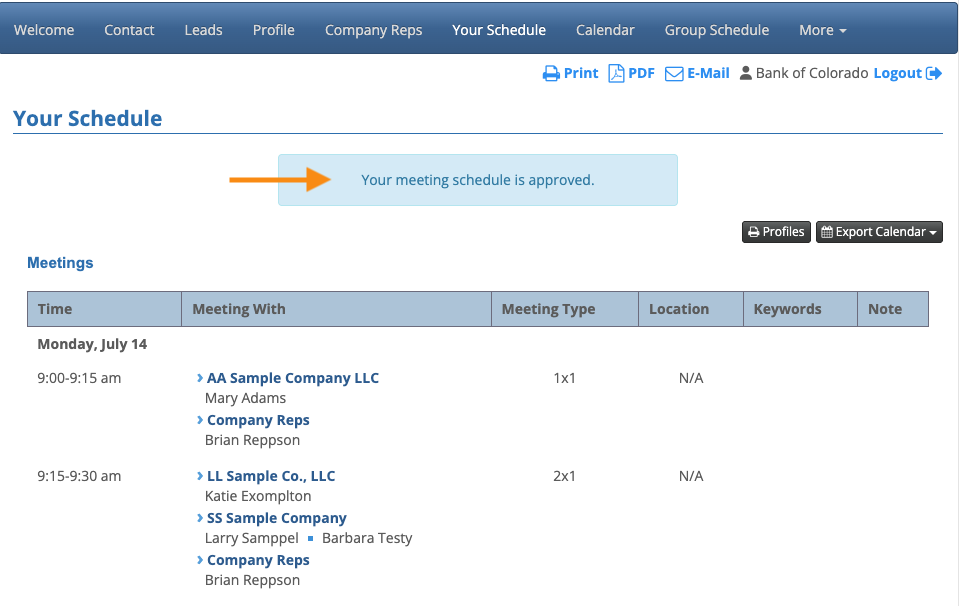
Once approved, MeetMax releases these meetings to the schedules of the other participants:
How Admins work with schedule approvals
For the most part, you’ll rely on your Approvers to approve their own schedules. But occasionally, you might need to change an individual’s approval status.
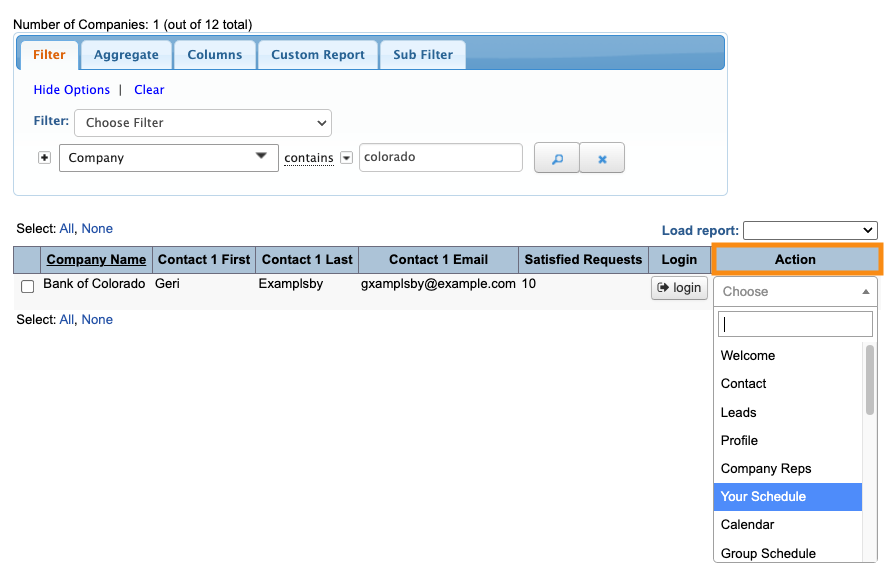
- Step 1. Head to the Company List:

- Step 2. Filter the list to locate the Company you need. Then use the Action menu to choose Your Schedule:
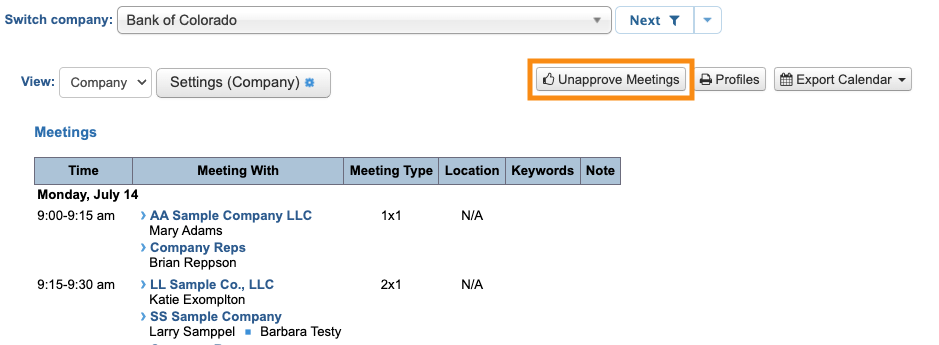
- Step 3. You’re now in the Admin view of this Company’s Your Schedule page. At the top of the page, you’ll see a button that shows this Company’s current approval status.
- • In the example below, the Company has already approved its meeting schedule.
- • As an Admin, you can click the Unapprove Meetings button to remove that approval:
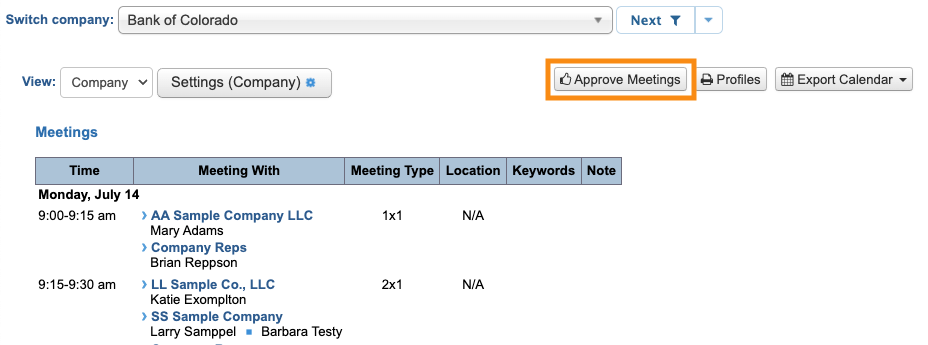
- • In the example below, the Company hasn’t yet approved its meeting schedule.
- • As Admin, you could click the Approve Meetings button to approve on their behalf:
- You can also toggle approval statuses on and off from the Company List. See the Tracking pending approvals section below for details:
-
Once an Approver marks their schedule as Approved, you can still schedule more meetings for them. Those meetings would automatically be visible to the participants, as if they were already approved.
If you wanted to have the Company approve the new meetings, you’d need to remove their previous schedule approval as shown above. Then you’d notify the Company to re-review and approve their schedule.
Tracking pending approvals
As your event nears, you’ll want to see how many of your Approvers have approved their schedules.
MeetMax offers several ways for your team to keep track of approvals. Feel free to use the methods that work best for you.
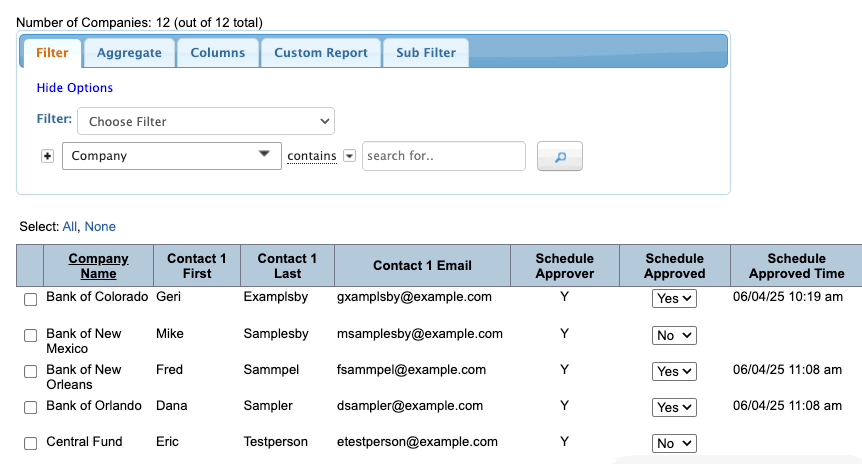
Adding approval status to the Company List
Since we granted approval permission to Companies in this example, the Company List now has some new columns available. (If we gave Attendees approval permission, those options would appear on the Attendee List.)
- Step 1. Head to the Company List:

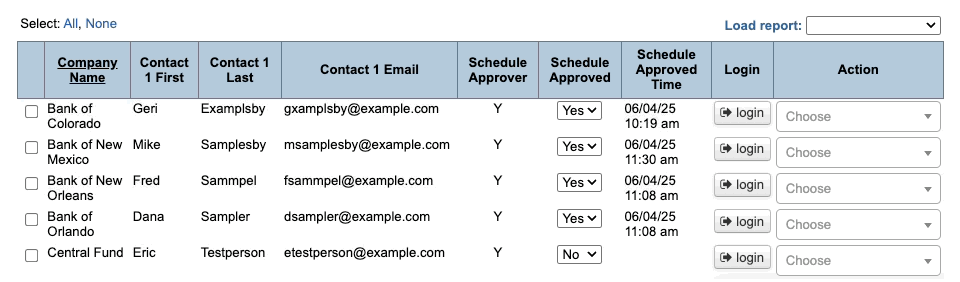
- Step 2. Go to the Columns tab. You can now add three new columns:
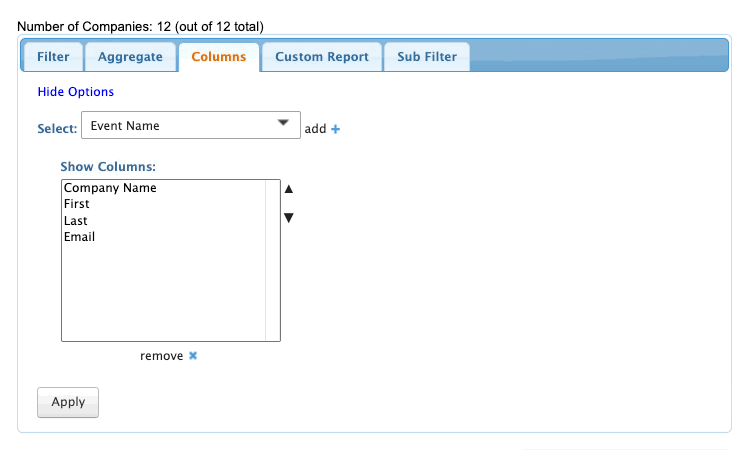
- • Schedule Approver: Shows whether this person has Approver permission
- • Schedule Approved: Shows the current approval status
- • Schedule Approved Time: Shows the most recent approval time (More on this below)
- Step 3. Click Apply to save the columns.
- You’ll now be able to see at a glance who has and hasn’t approved their schedules:
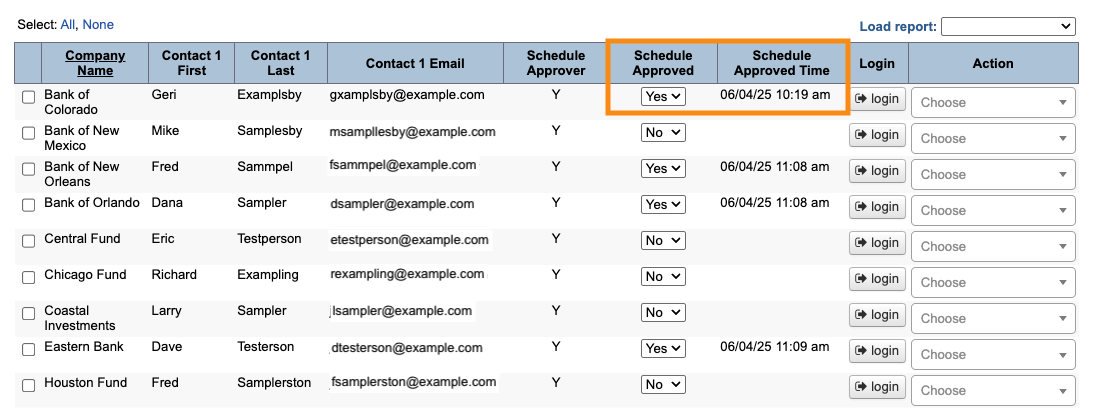
- Step 4. You can also approve or unapprove any schedule from here:

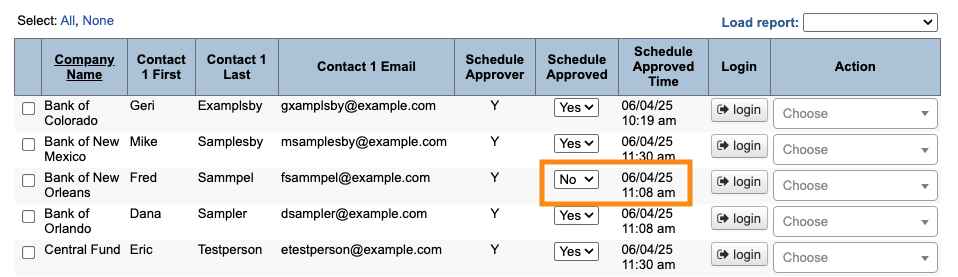
- If you remove a schedule approval, its most recent approval time stays in place. That way, you can tell at a glance which schedules were previously approved, but are currently unapproved:
Filtering and reporting
In the Filter tab, you can also filter your list by these columns: