In this article:
- Where is it?
- When is it helpful to reserve locations?
- Things to do before reserving locations
- Reserving a location for one participant
- Reserving a location for multiple participants
- Updating a reservation
- Removing a reservation
Where is it?
You’ll create and manage reservations from the Locations List:

When is it helpful to reserve meeting locations?
It’s not necessary to reserve meeting locations. MeetMax is also great at assigning meetings to the best available location, taking blackout times and availability into account.
For some meeting programs, however, reservations make a big difference:
- If you have an Unmoderated meeting program, Attendees schedule their own meetings. You might have some key Attendees who'd appreciate having a reserved meeting location. There will always be cancellations and rescheduling, but when there’s a reserved location, meetings automatically assign there.
- In a Moderated meeting program, you might have one or more VIP Companies at your event who need dedicated meeting locations.
- You might have multiple industries or disciplines involved in your event, and you want to keep similar types of meetings in the same locations.
Things to do before reserving locations
- Make sure you’ve configured the meeting time slots for your event
- Add or import your meeting locations to MeetMax. Make sure they’re set as Reservable.
- Add any blackout times needed for each location.
- Make sure you know the capacity of each location - how many concurrent meetings it allows.
Reserving a location for one participant
MeetMax has two methods for creating a single reservation.
Option 1: Reserving from the Company List or Attendee List
If you need to reserve a location for a single participant, for all event days, this is a quick method.
- Step 1. Head to the Company List.
- (If you need to reserve the location for an Attendee, the process is the same - start at the Attendee List instead.)

- Step 2. Filter the list to locate a Company you need to reserve a location for. Then use the Action menu to choose Reserve Meeting Location:

- Step 3. You’ll now see a view of your meeting locations.
- • The available ones are in black.
- • The already-scheduled ones are in red.
- Click the + button for the location you want to reserve. This creates a reservation for all event days and all time slots:

-
You can click more than one location here, and reserve them all for this Company. - Step 4. Need to reserve a location for a different participant? Use the drop down menu at the top to choose one. Alternatively, you can use the Next button to jump to the next participant on your list:

-
You can remove a reservation any time by clicking the X, as shown above.
Option 2. Reserving from the Locations List
This option is great if you have some participants sharing meeting locations, and others who need reservations for all days and times.
- Step 1. Head to the Meetings tab. Choose Meeting Location, then Locations:

- Step 2. On the Locations List, find the location you need to reserve. Then use the Action menu to choose Reserve:

- Step 3. Choose the All days option. Then start typing in the Company or Attendee name.
- Choose the participant, then click Submit:

- Step 4. Need to reserve a different location next? Use the drop down menu at the top of the page to jump to it:

Reserving a location for multiple participants
Sometimes, you might want two Companies or two Attendees to share one location, with each participant using it in different time slots.
- Step 1. Head to the Locations List and choose a location. Use the Action menu to choose Reserve:

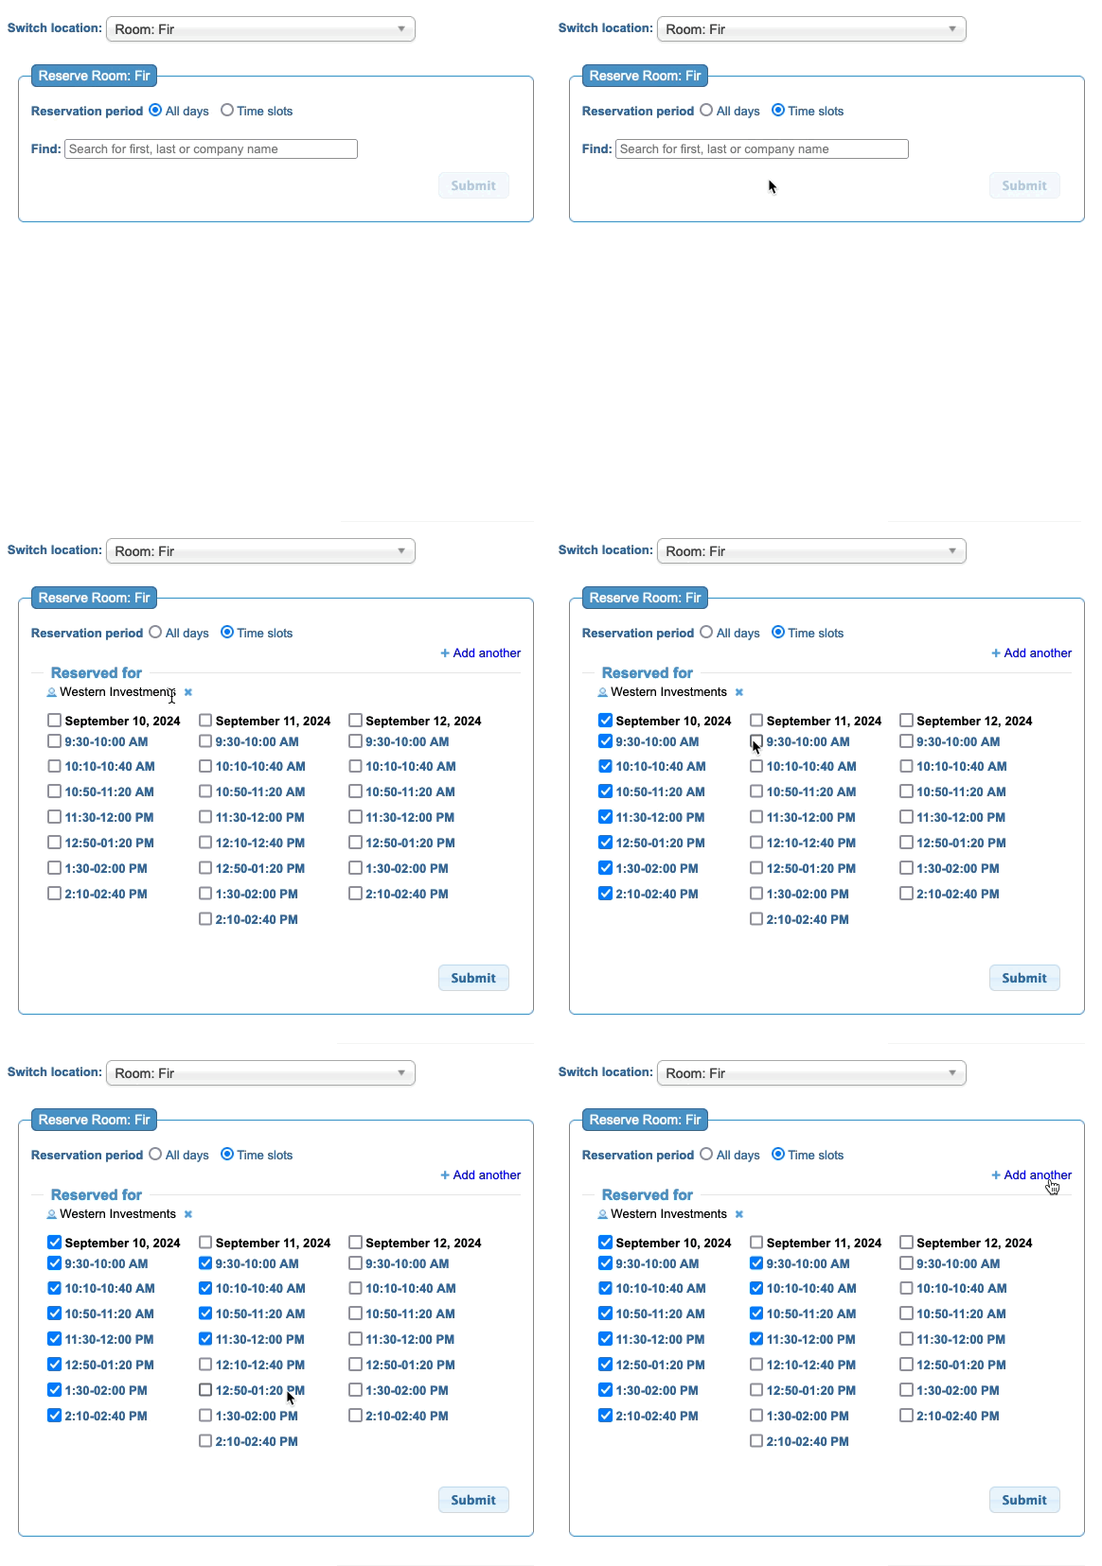
- Step 2. Choose the Time slots option.
- Next, start typing the Company or Attendee name. Then choose the name you need:

- Step 3. MeetMax displays all of this location's available time slots.
- Check the boxes for the time slots you want this participant to have the location.
- Step 4. Now, let’s assign the other time slots to a different participant. Click Add another, then repeat this process:

- Step 5. When you’ve chosen time slots for both participants, the reservation looks like this. Click Submit to save:

Variation for a location with more capacity
Here’s another location that’s reserved for two Companies to share. But in this case, they both have the room reserved for all time slots:

We can do this because the location’s Capacity is set to 2, meaning two concurrent meetings can happen here any time.
Updating a reservation
You can change a location reservation at any time. If you scheduled any meetings before this change, they’ll stay scheduled and assigned.
- Step 1. Head to the Locations List. Find the location you need to update. Use the Action menu to choose Reserve:

- Step 2. You’ll see the existing reservation for this location. Make any changes you like, and click Submit.
- In this example, we’ll take an All days reservation for one Company, and change it to a shared reservation with specific time slots:

Removing a reservation
Need to remove a reservation? Click the X next to the reserved participant's name:


