In this article:
- Where is it?
- Changing the time slot or location
- Rescheduling one participant of a group meeting
- Adding or changing participants
- Notifying participants of changes
| As an option, you can enable your Attendees to send you change requests for their scheduled meetings through MeetMax. |
Where is it?
You’ll manage scheduled meetings through the Company List or Attendee List:


Changing the time slot or location
We’ll show the Company List here, but you can use the same process to make these changes from the Attendee List.
- Step 1. Head to the Company List:

- Step 2. Filter the list to find the Company whose meeting you need to update. Then use the Action menu to choose Meeting Times:

- Step 3. You can do all kinds of things on the Meeting Times page - book new meetings from requests, create them from scratch, and make changes to existing meetings.
- We’re updating an existing meeting here. Click on the tab for the event day you need. Then locate the meeting you want to update, and click the Edit icon:

-
Your Admin team can use the Add Notes button at the top of this page to post internal notes and reminders. Learn more about internal notes here. Wondering about those numbers after each participant's name? Learn more here. - Step 4. You’ll now see a pop-up with the meeting’s details. Here, you can choose a different time slot or location for the meeting (or both). Click Submit to save:

-
MeetMax prevents schedule conflicts, so the Meeting Location menu will only show you the locations that are available for your chosen time slot. MeetMax also has an Assign Locations Grid, which is a visual tool for managing meeting locations.
Rescheduling one participant of a group meeting
Sometimes, you’ll have multiple participants scheduled in the same meeting, like the example below.
- You can follow the steps above to reschedule everyone in this group.
- If you need to reschedule just one of them, follow these steps.
- To reschedule one person to a new meeting, read on!
- Step 1. To get started, click the Edit icon for the meeting:

- Step 2. In the pop-up with meeting details, click the Reschedule link:

- Step 3. Now, you have a checkbox for each participant. Click the person you need to reschedule. (You can click more than one person if they need to be rescheduled together.)
- Then, choose another time slot for this person. You can also opt to remove the remaining participants from this meeting, if needed.
- Click Submit to save the changes:

-
Some of the available times have an asterisk next to them. There’s already another meeting scheduled at this time, but you can add this participant to that existing meeting. - Step 4. MeetMax will create a new meeting for this person at the time you chose. You’ll now see it in the meeting schedule.
- This meeting needs to have a location assigned:

- Step 5. Click the Edit icon for this meeting, and follow the process in the section above to choose a location.
Adding or changing participants
There are two ways to add more participants to a meeting in MeetMax:
You can use either or both options, depending on the needs of your event. Follow the links above for more details.
Notifying participants of changes
MeetMax offers two ways to update participants on meeting changes. You can use either one, depending on your needs.
Notifying of a single change
Any time you’re updating a scheduled meeting, you’ll see the option to send email. Choose Yes, and add an optional personal message.
Clicking Submit both saves the change and sends the email:

Each participant will get an email that looks something like this:

| MeetMax will also send an in-app notification to each participant’s MeetMax Inbox. |
Notifying of multiple changes
You can also batch-send updated schedules to a group of participants. This comes in handy if you’re updating several meetings at once, and they all affect the same set of Attendees.
Learn more about batch emailing from MeetMax here.
- Step 1. Once you’ve made all the meeting changes, head back to the main Company List or Attendee List page (depending on who you need to email).
- Step 2. Filter the list to narrow the list down to the participant(s) you need to update.
- • If you've been updating schedules for participants from the same Company, you can filter by a Company name.
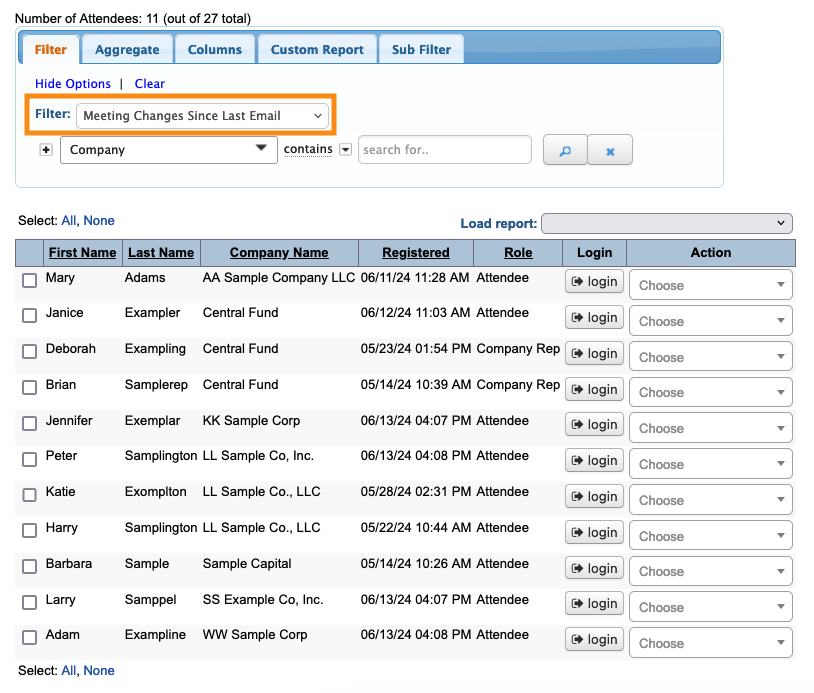
- • If you've just updated a lot of schedules for unaffiliated participants, the Meeting Changes Since Last Email filter can be useful:

- Step 3. When you’ve filtered the list to the recipients you need, head to the top right corner of the page. Click Bulk Actions, then choose Batch:

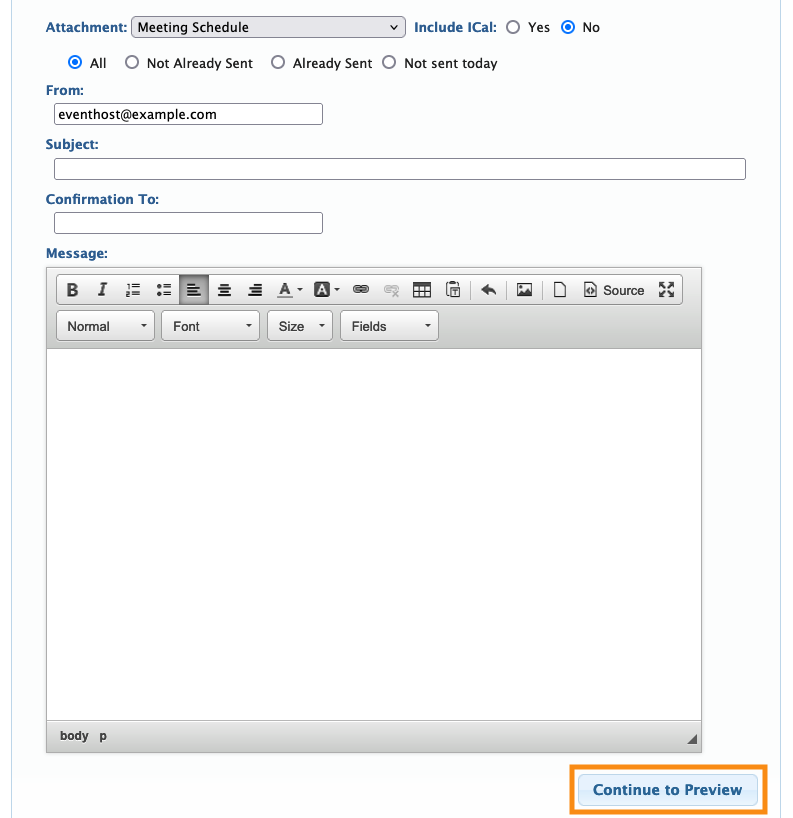
- Step 4. You’ll now see the batch email editor. In the Attachment menu, choose Meeting Schedule. That will personalize each recipient’s email with their updated schedule:

- Step 5. The Attachment contains all the email content, so you won't need the Message field. Click Continue to Preview:

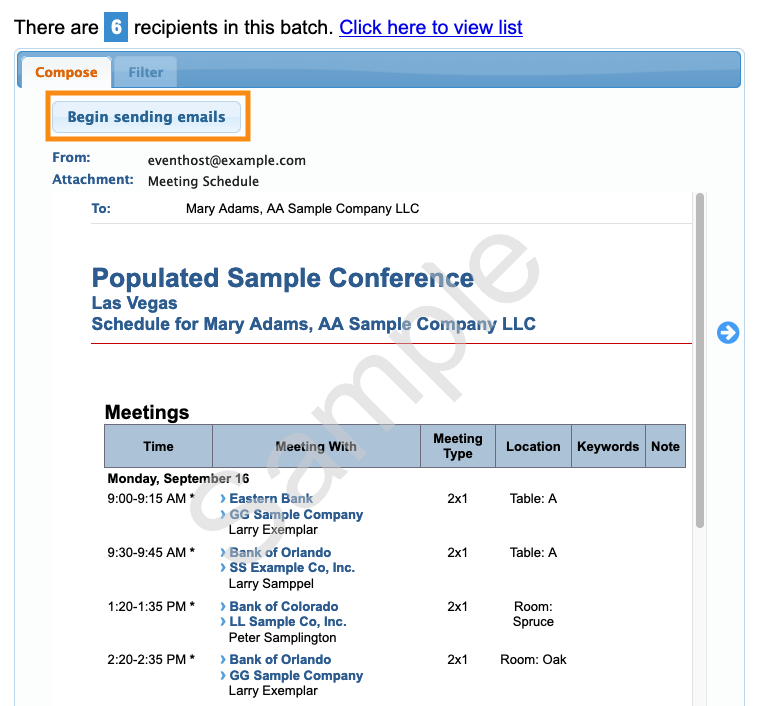
- Step 6. You’ll see a preview of the email. If all looks right, click Begin Sending Emails:


